
No matching lessons or pages. Try a shorter term or clear the search.
01
Start with your phone
Choose your defaults, decide how to capture expenses, then start tracking. A Pennie account is optional.
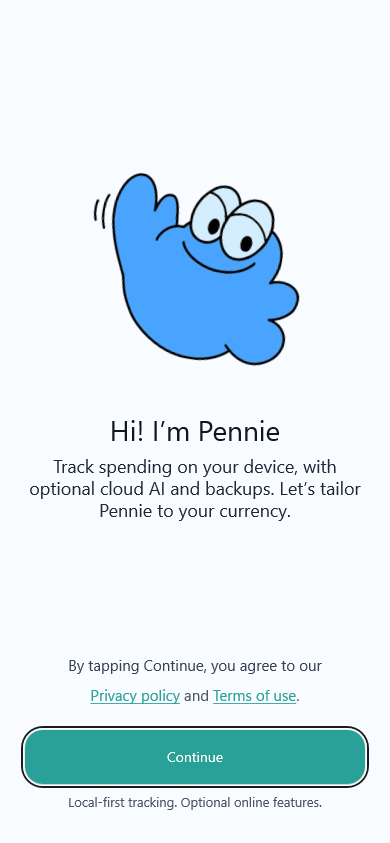
Find it: First launch > Welcome
Start with the welcome screen and the links to the Privacy Policy and Terms. Pennie keeps the device database as the source of truth; optional connected features have separate choices.
How to use it
- Open Privacy Policy or Terms to read the details before continuing.
- Choose Continue to save the current installation's general acknowledgement and open currency setup.
- This acknowledgement is remembered. It does not enable cloud AI, connect Google Drive or grant Android notification access.
 Open full screenshot
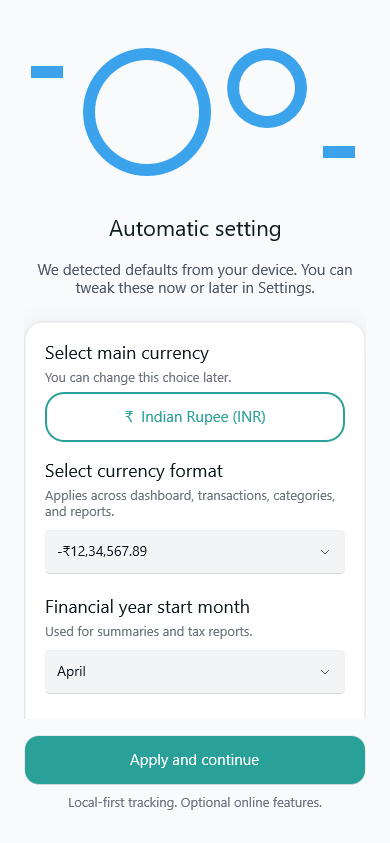
Find it: Welcome > Continue > Currency setup
Check the defaults before entering money. Choose the currency, number format, financial-year starting month and the languages used in your bank messages.
How to use it
- Review the device-based suggestion rather than assuming it matches your bank.
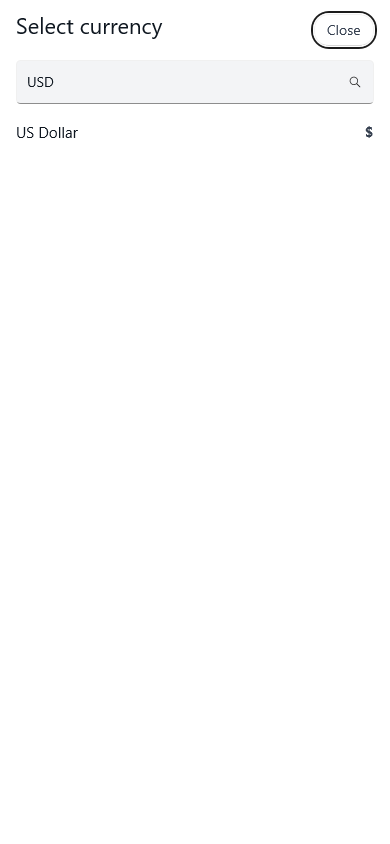
- Open the currency selector and search for the currency you want.
- Check number formatting and the start of your financial year.
- Choose the bank-message languages you need, then Apply to continue. These are parsing choices, not a guarantee that every message can be understood.
 Open full screenshot
 Open full screenshot
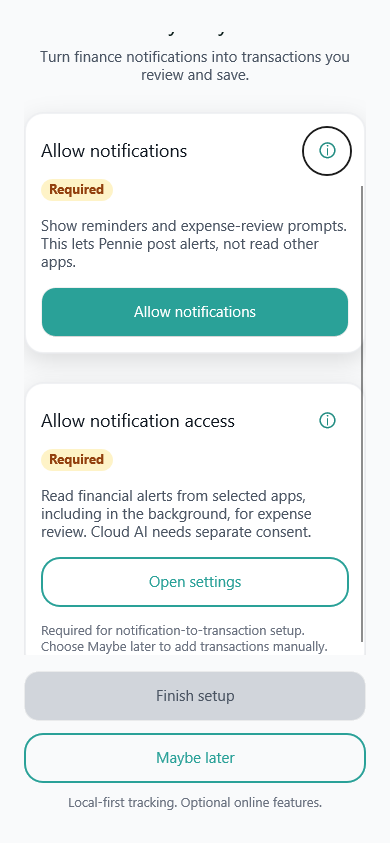
Find it: Currency setup > Apply > Notification setup
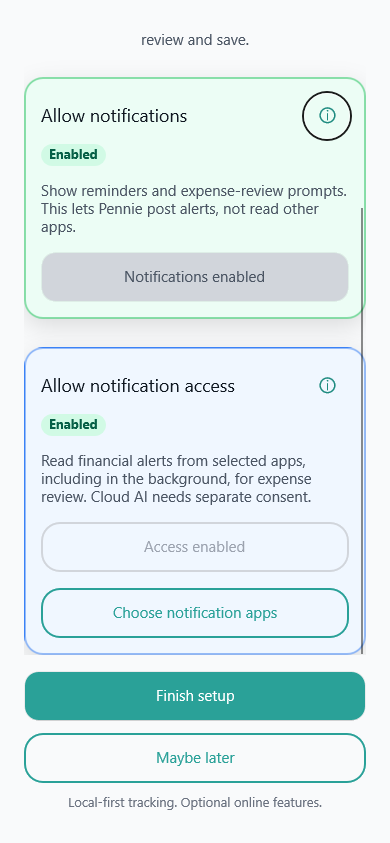
Android has two different permissions: letting Pennie display alerts and letting it read notifications from apps you select.
How to use it
- Use the alert permission action to let Pennie show reminders and captured-finance suggestions.
- Open notification access. In Android Settings, search for Pennie or scroll down to find Pennie, open its entry and allow access if you agree.
- Return to Pennie and check that the permission status has changed. Android's screen names and arrangement vary by phone.
- Select the bank, payment, SMS or email apps that should be monitored.
- Finish setup when ready. Maybe later keeps manual entry available without completing automatic capture.
 Open full screenshot
 Open full screenshot
Find it: End of onboarding > Sign in, or Settings > Profile
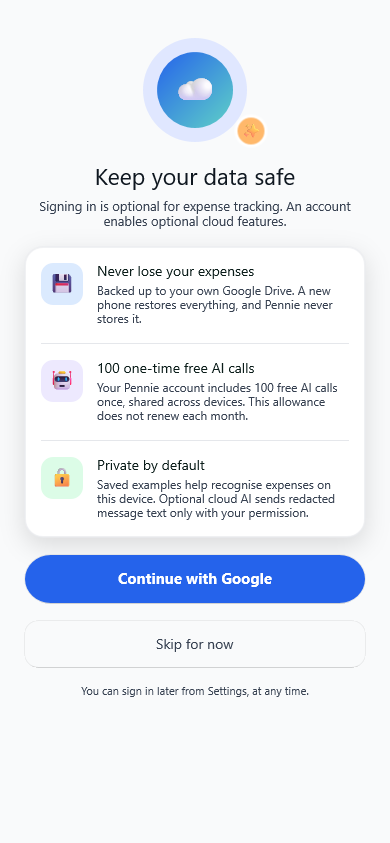
Google sign-in is optional for local tracking. An account supports account features such as AI allowance and referrals; Drive backup still needs its own eligibility and authorisation.
How to use it
- Choose Google sign-in if you want connected account features, or Skip to start with local tracking.
- If sign-in is interrupted or fails, retry when connected rather than creating duplicate local transactions.
- Read any eligible restore offer carefully before accepting it: restore replaces the local database rather than merging it.
- Later, open Profile to view your account, recover an expired session or sign out.
 Open full screenshot
02
Your everyday money
The five tabs are Dashboard, Transactions, Categories, Reports and Settings. They describe your recorded ledger, not a live bank account.
Find it: Bottom tabs > Dashboard
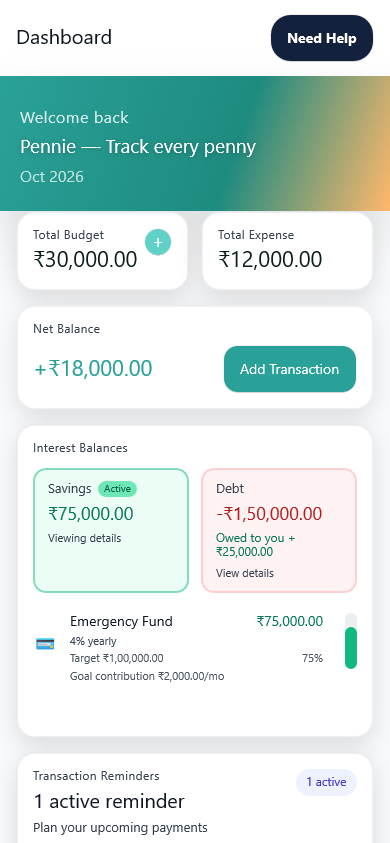
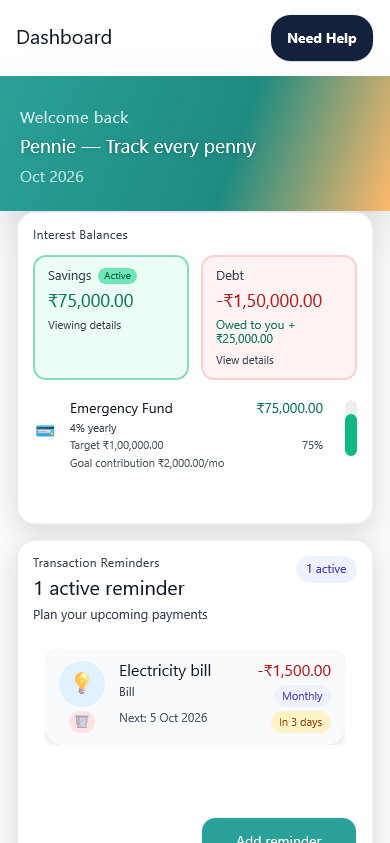
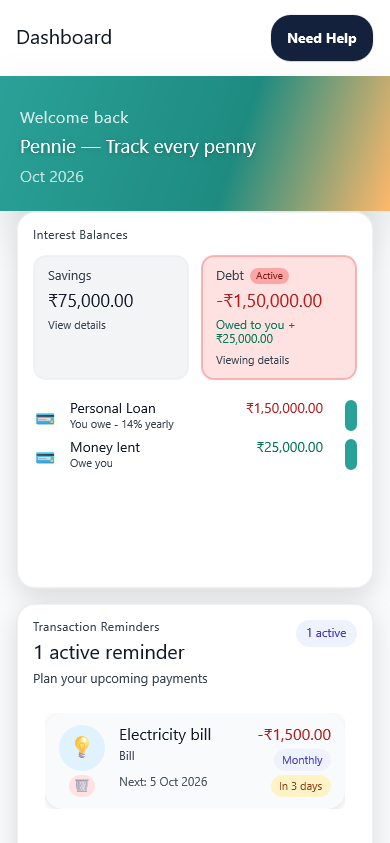
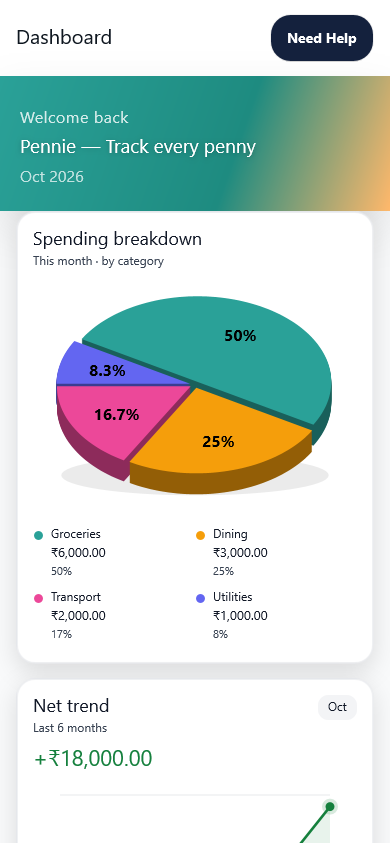
See the current month's Budget, Expense and Net, then explore savings, debt, reminders, subscriptions and charts. The numbers come from entries saved in Pennie.
How to use it
- Use Budget and Expense to check recorded income and spending. Net is Budget minus Expense, not a bank balance.
- Use the quick-entry actions to record money or open the matching transaction list.
- Review savings and the two debt directions separately: money you owe and money owed to you.
- Open reminders and subscriptions to manage planned or recurring activity.
- Scroll to the spending breakdown and six-month trend to see patterns. Tap the relevant detail or open Reports for more analysis.
 Open full screenshot
 Open full screenshot
 Open full screenshot
 Open full screenshot
Find it: Bottom tabs > Transactions
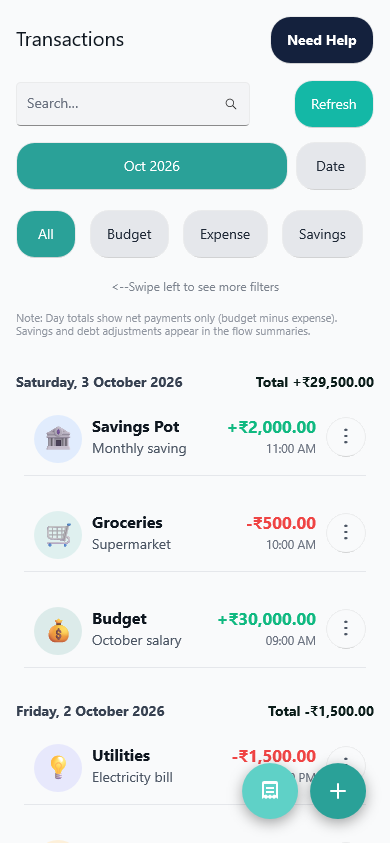
This is the saved ledger. Pending finance notifications do not become transaction rows just because Pennie captured or analysed them.
How to use it
- Choose a month and, optionally, a day to narrow the list.
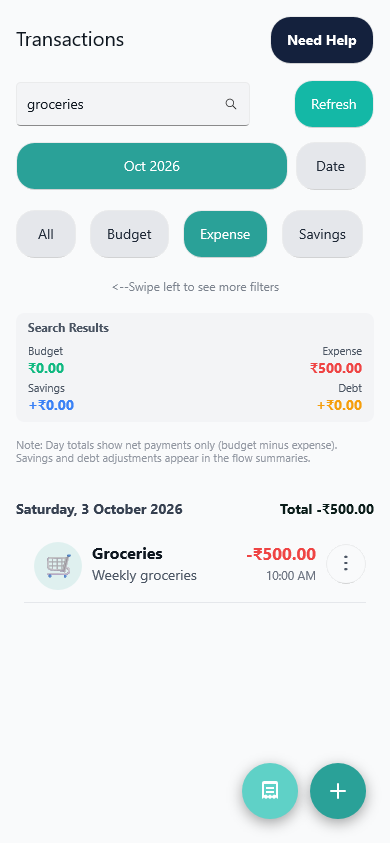
- Use the flow filters and search to find a note, category or other matching entry. Scroll the filter strip if needed.
- Read filtered totals in their context; clear search and day selection to return to the wider period.
- Open an entry to review or edit it. Check its flow, category, amount, date and notes before saving.
- Use deletion and any available Undo promptly. Review multi-selection carefully before confirming bulk deletion.
- Use Add for manual entry or the bill action for a receipt workflow.
 Open full screenshot
 Open full screenshot
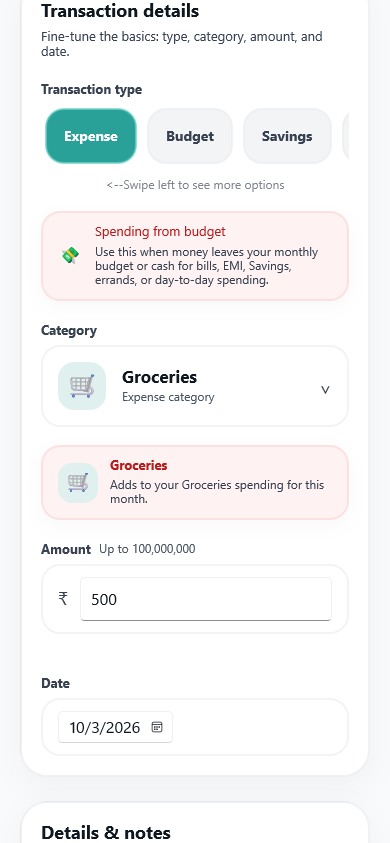
Find it: Dashboard quick action or Transactions > Add
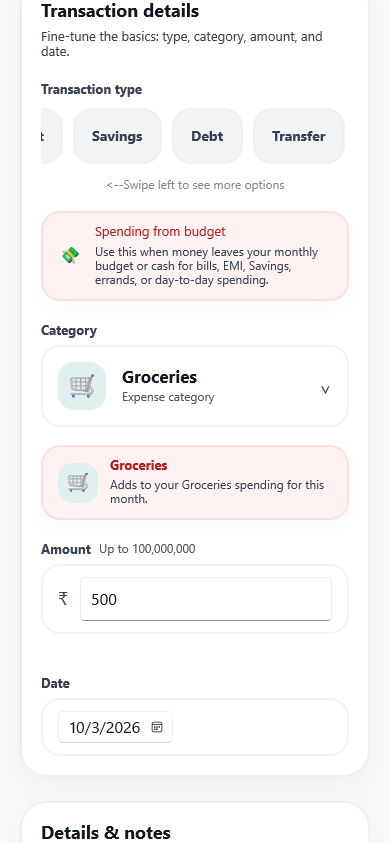
Choose what the money movement means before saving. The form supports Budget, Expense, Savings, Debt and Transfer, with controls that change to suit the selected flow.
How to use it
- Choose the flow. Budget records income; Expense records spending. Savings and Debt track their own movements.
- Choose a compatible category and, when useful, a subcategory. Returning from the picker keeps your current form choices.
- Enter the amount and date, then add a clear note. Review prefilled information from a notification instead of assuming it is correct.
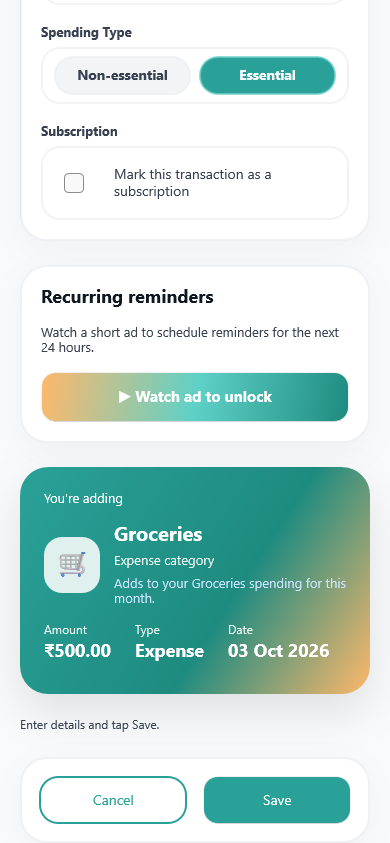
- For expenses, choose Essential or Non-essential. Enable subscription or reminder options only when you need them.
- For Transfer, select different valid source and destination categories. For Debt, verify who owes whom and whether the entry increases or reduces that balance.
- Check the final summary and Save. Back or Cancel is not a save.
 Open full screenshot
 Open full screenshot
 Open full screenshot
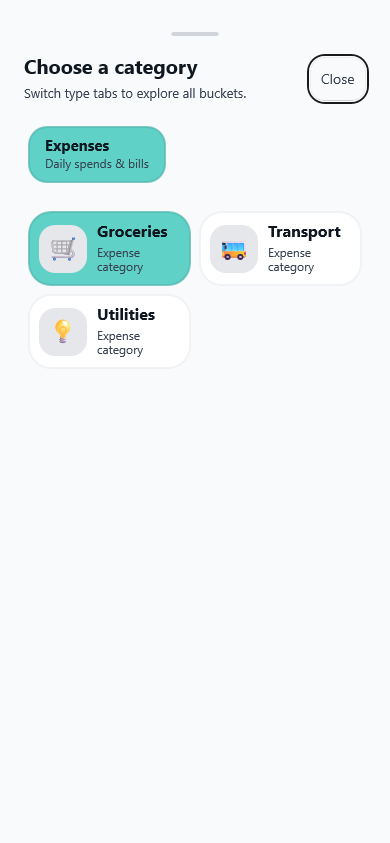
Find it: Add transaction or Add reminder > Category
The category selector is a full modal page, not the old inline selector. It shows the categories compatible with the calling form.
How to use it
- Open Category after choosing the transaction flow.
- Browse the grouped list or search for the category name.
- Select an available category to return to the form, then review any subcategory.
- Cancel or go back to retain the previous selection. A transfer destination must not be the source category.
 Open full screenshot
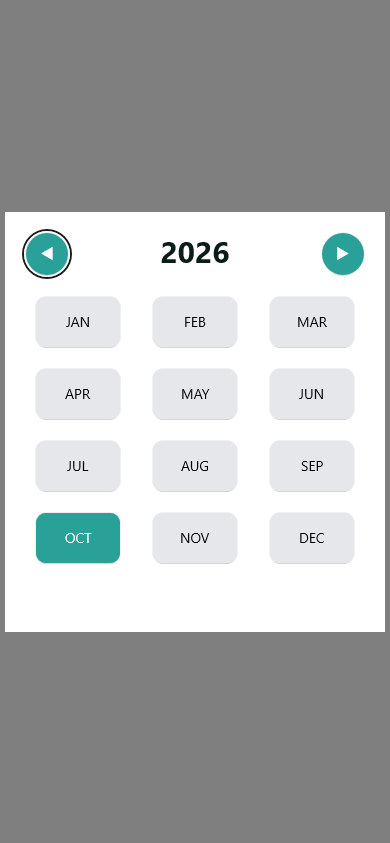
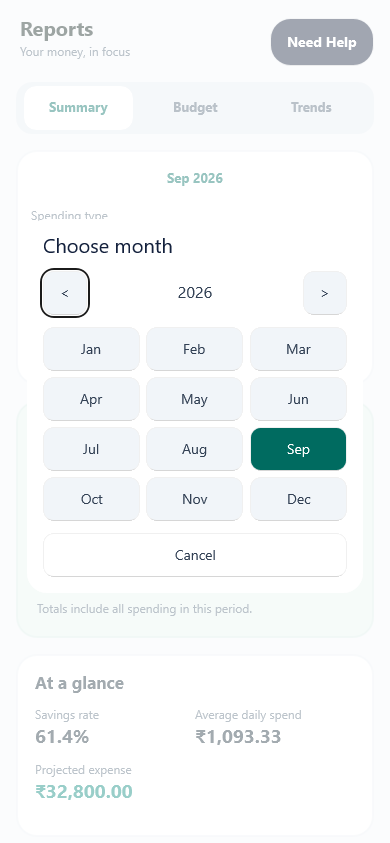
Find it: Transactions or a month-based page > Month selector
Use the month-and-year selector to browse saved history without changing transaction dates.
How to use it
- Open the displayed month.
- Move between years with the previous/next controls.
- Tap a month to select it immediately and close the picker. There is no separate confirmation or Cancel button.
- Inspect the refreshed list or totals before changing filters again.
 Open full screenshot
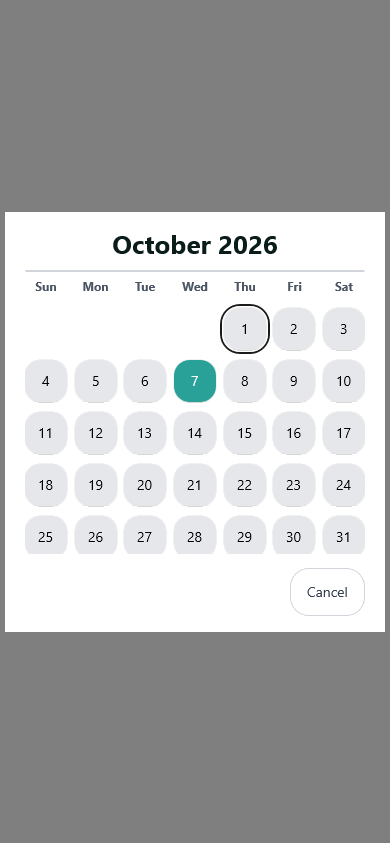
Find it: Transactions > Day filter
Select a day inside the current month to focus the ledger and its filtered totals.
How to use it
- Choose the month first, then open the day picker.
- Select the day you want to inspect.
- Combine the day with a flow filter or search only when you want all of those restrictions.
- Clear the day filter to show all days again; cancel the picker to keep the prior selection.
 Open full screenshot
Find it: Bottom tabs > Categories
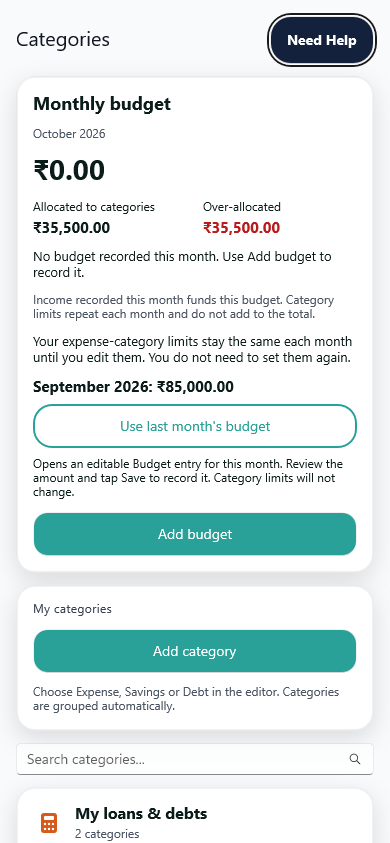
Organise your expense, savings and debt categories, set limits or targets, and compare category allocation with the current month's recorded Budget.
How to use it
- Read the Monthly budget card: recorded Budget, allocated category limits and remaining allocation answer different questions.
- Expense-category monthly limits already repeat. You do not need to re-enter each limit every month.
- When this month has no recorded income and last month has a positive Budget, use Use last month's budget.
- Pennie reloads the amount and opens an editable current-month Budget entry. Check or change the value, then Save when correct.
- Search or browse categories and open an editor to change a limit, target, name or supported setting.
- If reuse is unavailable, check the Budget category and recorded income. Use the normal budget-entry action when appropriate.
 Open full screenshot
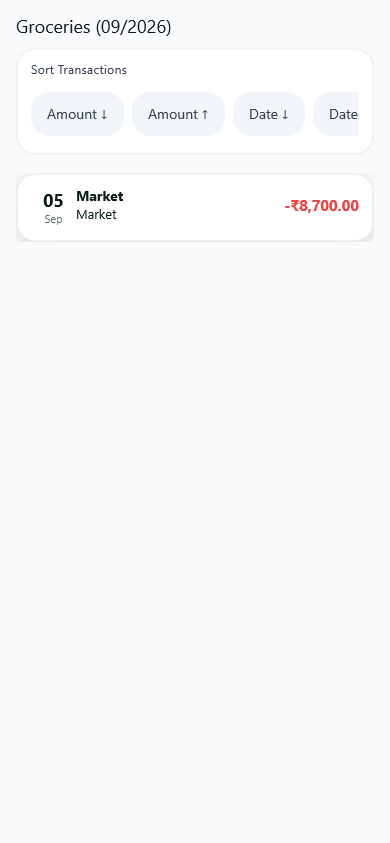
Find it: Reports > Tap a category row
Look at the entries behind a category total rather than treating its limit or target as a payment.
How to use it
- Open the category's transaction details and check the category name.
- Select the period you need and inspect the totals and saved rows.
- Distinguish ordinary movements from recorded interest entries.
- Open a supported entry action to correct the underlying transaction, then return to see the refreshed history.
 Open full screenshot
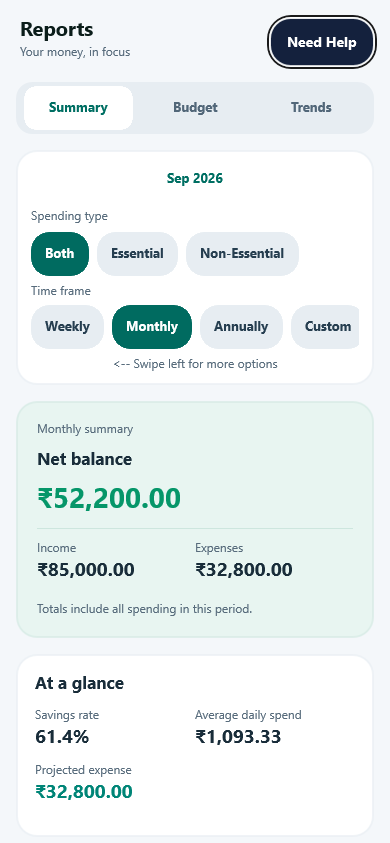
Find it: Bottom tabs > Reports
Local Reports is free to open: no sign-in, rewarded ad or Premium purchase is required. Explore recorded spending, budget usage and trends without generating a cloud AI report.
How to use it
- Start in Summary and choose the reporting period. Read Income, Expenses and Net together.
- Use Essential, Non-essential or Both for the detailed breakdown. The headline summary still represents all spending.
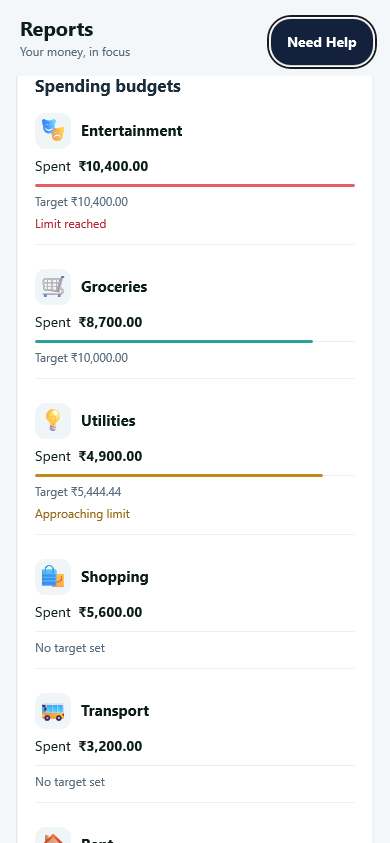
- Open Budget for the current month's category limits, usage and goals. A budget limit is not an expense.
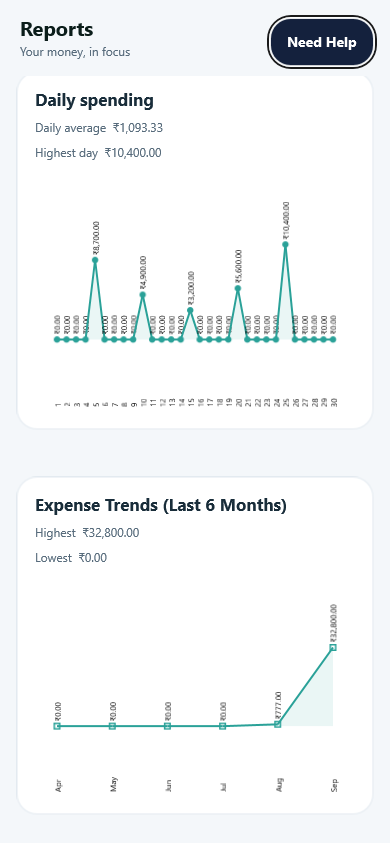
- Open Trends to compare periods, category breakdowns, daily activity and longer history.
- Select categories or chart details to investigate a pattern rather than inferring a payment from a chart alone.
- Use Settings > Reports for a local Excel workbook when you need the underlying tables.
 Open full screenshot
 Open full screenshot
 Open full screenshot
03
From a message or bill to a saved entry
Captured information stays separate from your ledger until you save it, unless you deliberately enable eligible automatic saving.
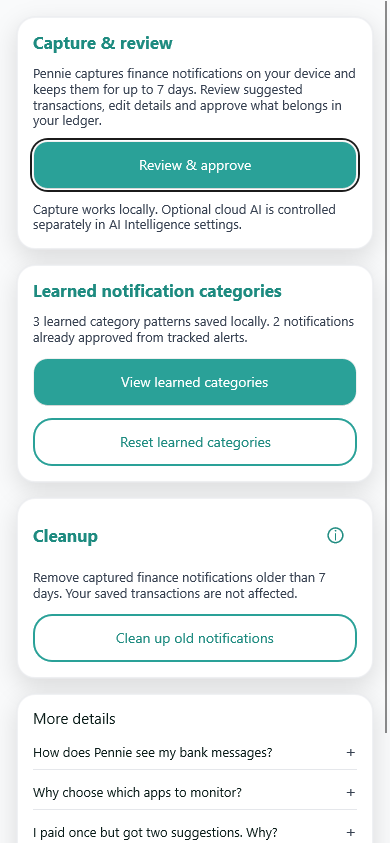
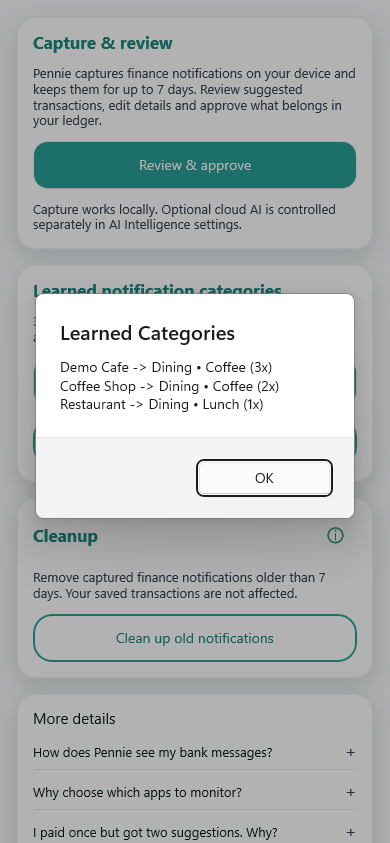
Find it: Settings > Track Finance Notifications
Manage what Pennie captures and where to review it. Capture settings are separate from the reminders and alert-delivery settings.
How to use it
- Check the notification-access status and revisit Android Settings if access was revoked.
- Open Notification Apps to choose the sources Pennie may monitor.
- Open Notifications Review to inspect retained finance messages. For an older SMS, share its text from your SMS app to Pennie.
- Review the learned-choice information when troubleshooting suggestions.
- Read cleanup and reset confirmations carefully. Clearing captured messages or learned hints is not the same as deleting saved ledger transactions.
 Open full screenshot
 Open full screenshot
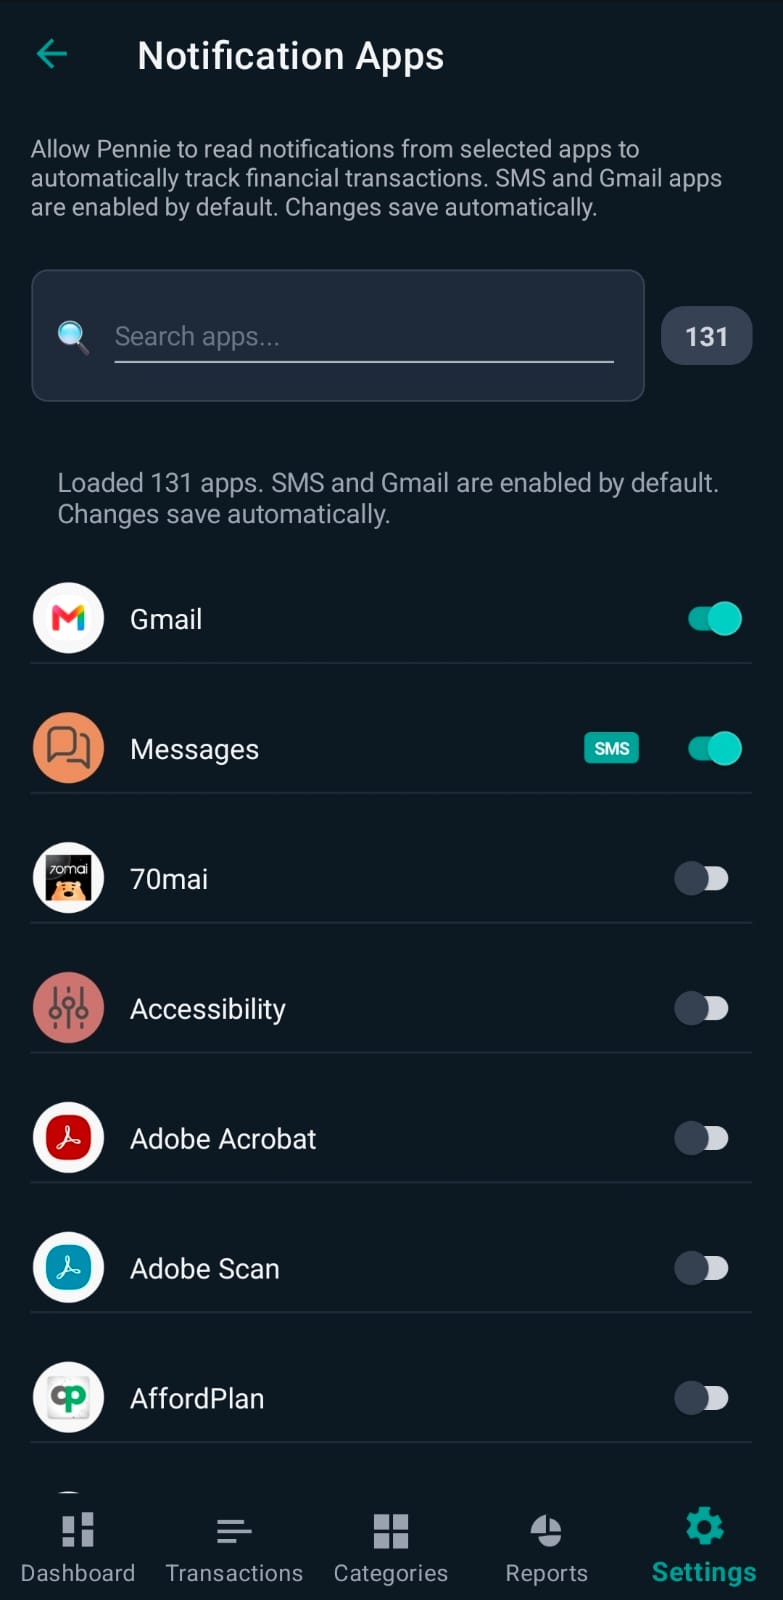
Find it: Settings > Track Finance Notifications > Notification Apps
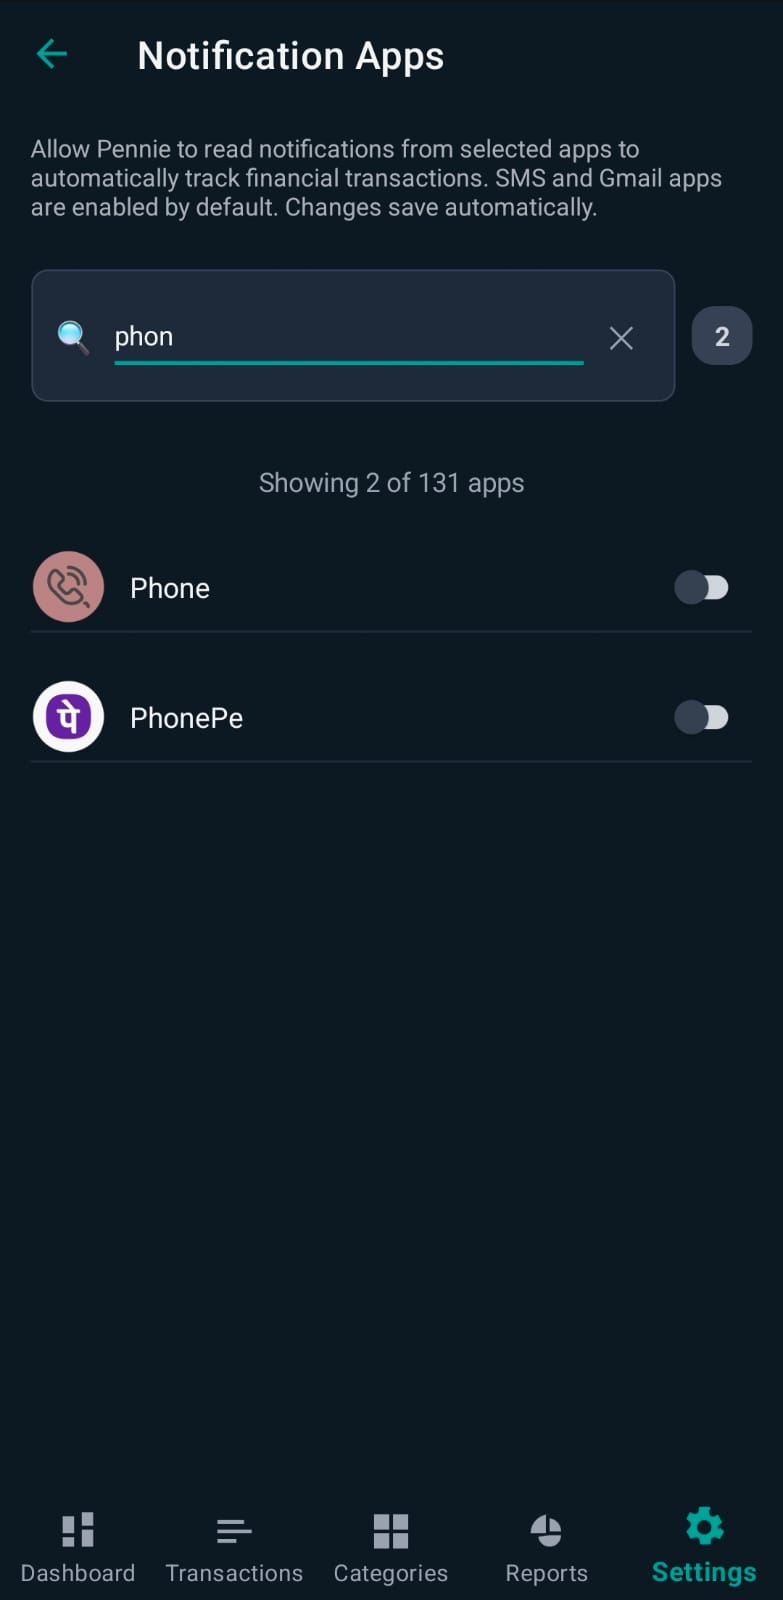
Choose relevant bank, payment, SMS and email apps. The searchable list is an allow-list for future notification capture.
How to use it
- Review the listed apps and their current switches.
- Search by app name to find a specific source.
- Enable only the apps you want Pennie to monitor; turn off sources you do not need.
- If saving a choice fails, read the error and retry. Do not assume a switch change was retained.
- Clear the search to see the full list and check the final selection.
 Open full screenshot
 Open full screenshot
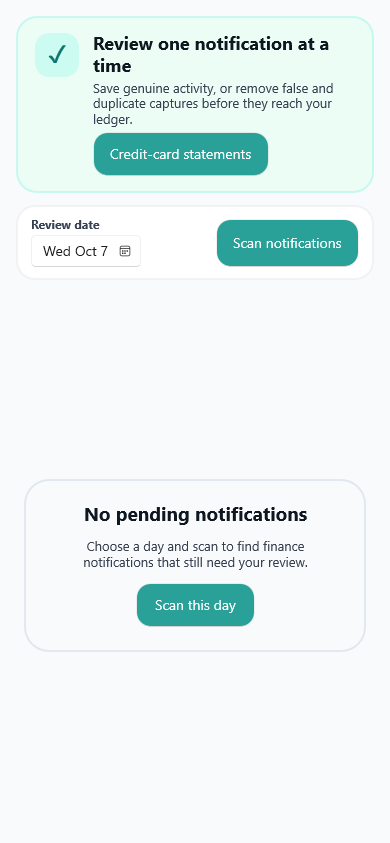
Find it: Settings > Track Finance Notifications > Review & approve
Review captured finance notifications before they become ledger entries. Several channels for one uniquely identified transaction can be represented by one review item.
How to use it
- Open the review list and inspect the retained message, amount and date.
- Open a suggestion to review the proposed category and subcategory, or use the manual-entry action if these are unknown.
- Confirm uncertain finance candidates explicitly; they are not already verified expenses.
- Save the corrected transaction when ready, or Ignore an item that should not be recorded.
- Return later to pending items without expecting a new AI request merely from reopening the screen.
 Open full screenshot
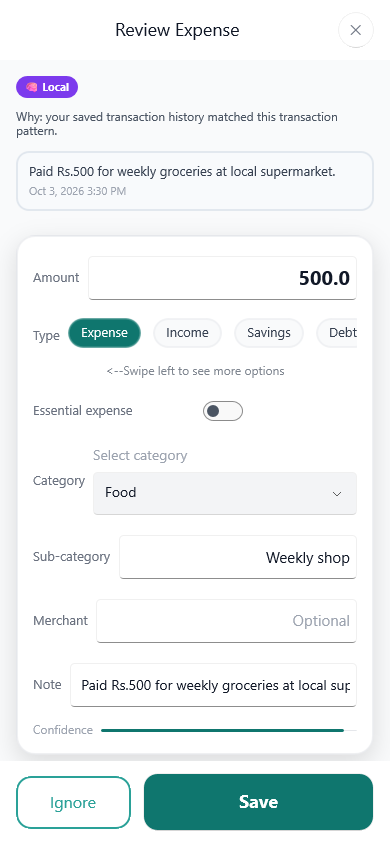
Find it: Tap a suggested-expense notification or open its pending review
Pennie prepares the suggestion during capture so you can concentrate on checking it. A suggestion is still not a saved expense.
How to use it
- Read the amount, direction and available message context.
- Check the category and subcategory against what you actually bought, not merely the payment gateway.
- Correct the date, type or other editable fields as needed.
- Use Save to create the ledger entry. Your saved correction becomes evidence for future local suggestions.
- Use Ignore or leave the item pending when it is not ready to save.
 Open full screenshot
Find it: Your SMS app > Select the message > Share > Pennie
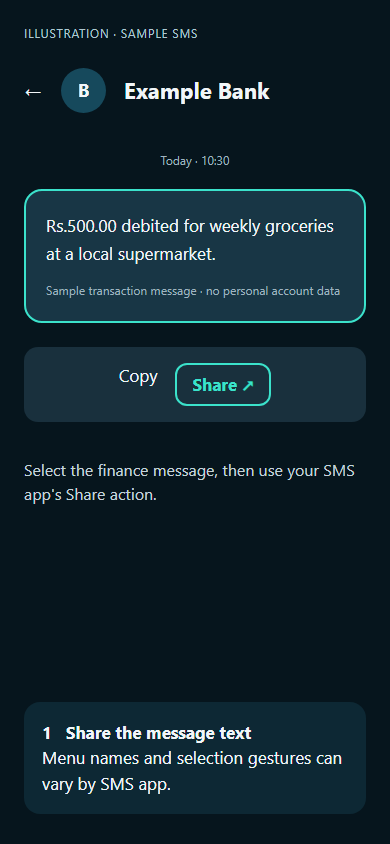
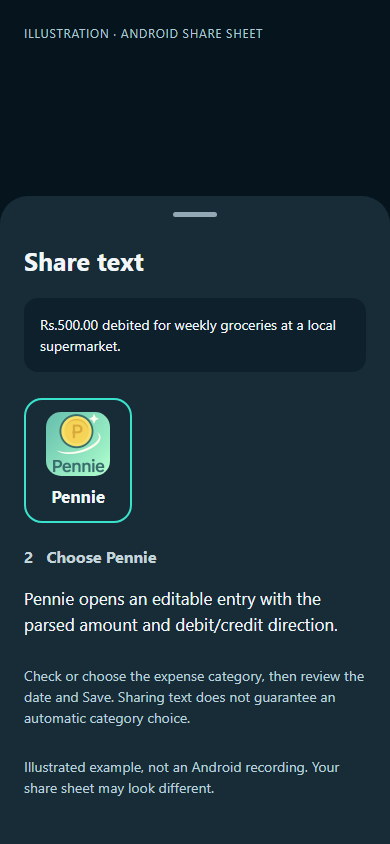
Share one finance message from your SMS app when you want to add it deliberately. Pennie parses the shared text and opens an editable transaction.
How to use it
- Open the completed transaction SMS and select the message text. Use the SMS app's Share action; its menu may vary by app.
- Choose Pennie in Android's share sheet. If needed, unlock Pennie before continuing.
- Check the automatically parsed amount and debit/credit direction. Correct any missing or misread value.
- Check or choose the expense category and subcategory. Sharing text does not guarantee an automatic category choice.
- Verify the date and note, then Save only after checking that the transaction is not already in your ledger.
 Open full screenshot
 Open full screenshot
Open full screenshot
Open full screenshot
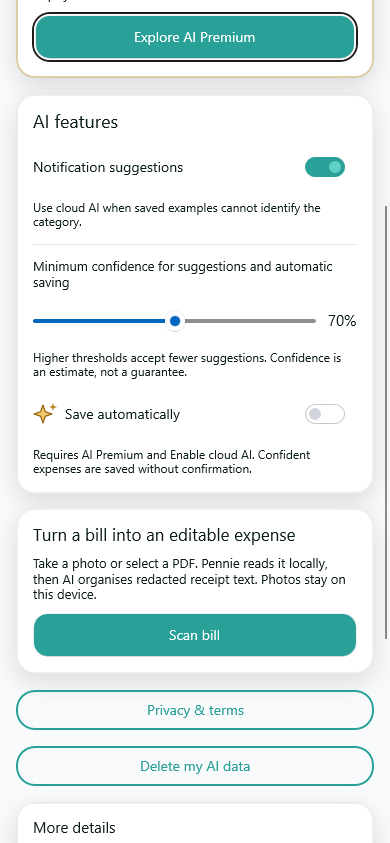
Find it: Settings > AI Intelligence
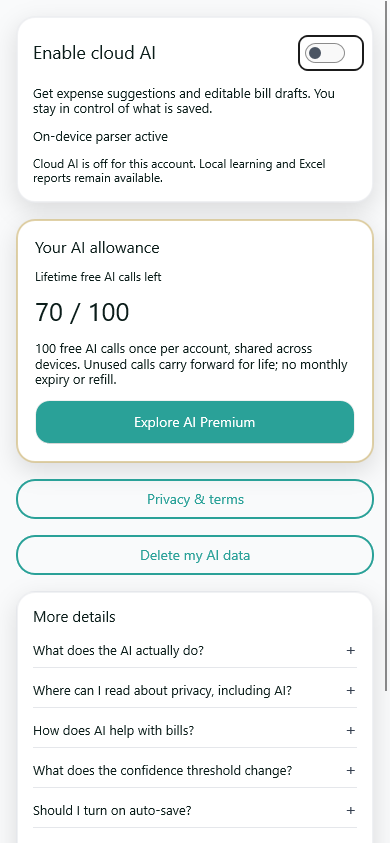
Keep local learning first and allow optional cloud help when the saved evidence cannot resolve an expense. This page brings the master permission, usage and AI controls together.
How to use it
- Check your account state. Recover an expired session if prompted; an expired session is not a new account.
- Turn on Enable cloud AI only if you want cloud assistance and complete the same-page agreement.
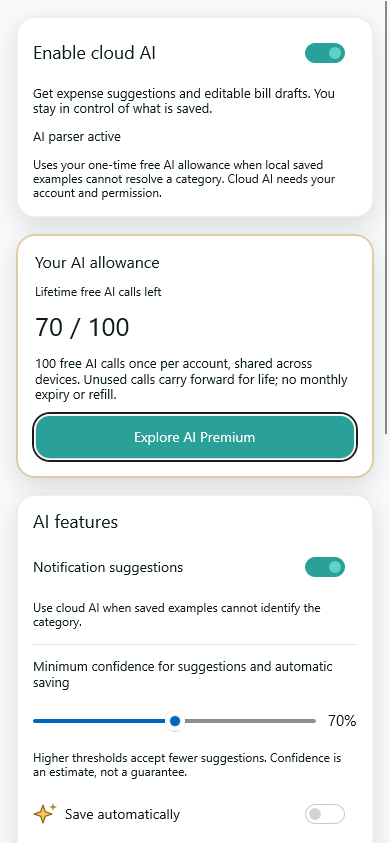
- Read the usage card: 100 free AI calls, once per account, shared across devices. Unused calls carry forward for life without expiry; free usage does not reset monthly.
- Choose the supported notification-analysis settings and confidence threshold. Uncertain results still need review.
- AI Premium has a monthly allowance. Automatic saving additionally requires that plan, cloud AI enabled, your explicit auto-save choice and the threshold at save time.
- Use Scan bill for a deliberate receipt action. Turning cloud AI off stops future uploads.
 Open full screenshot
 Open full screenshot
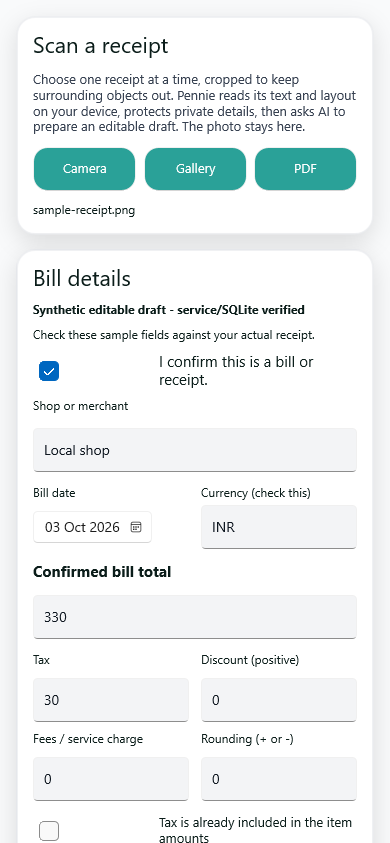
Find it: Settings > AI Intelligence > Scan bill, or the bill action in Transactions
Capture or select a receipt, recognise its text locally, and review a draft before saving. Text-only cloud assistance can help interpret the recognised bill when you have permission and allowance.
How to use it
- Use the camera, photo picker or supported document picker to choose the receipt.
- Check the recognised shop, date, currency, total and item rows. Local OCR may miss words or numbers.
- With cloud AI enabled and allowance available, Pennie can send bounded redacted recognised text rather than the original image.
- Correct the draft yourself. Later category suggestions must not replace amounts you edited.
- Choose a single expense or item-by-item save, review reconciliation warnings and save only when the complete bill agrees.
 Open full screenshot
Find it: Bill draft or a transaction's receipt action
Keep the receipt and its accounting consistent. Choose whether the whole bill belongs to one expense or needs separate item expenses.
How to use it
- Review every item, quantity, amount, discount or adjustment represented in the draft.
- Make the final total agree at the receipt currency's precision before saving.
- Choose one-expense or split mode, not both for the same imported file.
- Confirm a match to an existing payment explicitly; a similar amount does not identify the same purchase.
- Open the saved receipt attachment from its transaction when needed.
Open full screenshot
04
Budgets, reminders and useful tools
Organise repeat spending and explore estimates without confusing a plan, reminder or category limit with money actually paid.
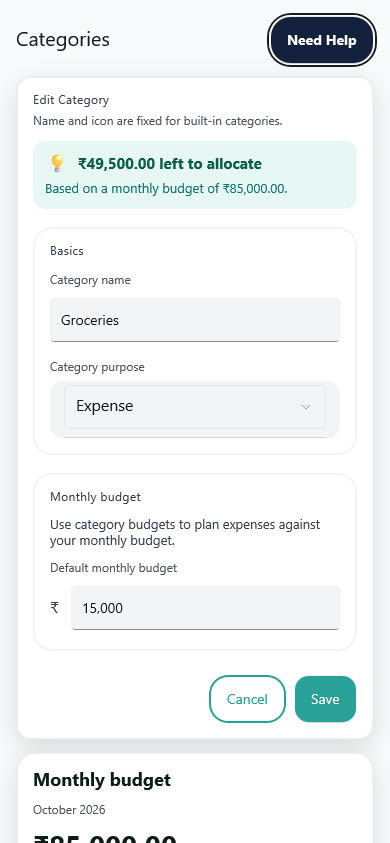
Find it: Categories > Edit or Add category
Give each category the right purpose. Expense limits, savings targets and debt terms describe different things.
How to use it
- Choose a supported category type when creating a custom category and give it a meaningful name.
- Choose an icon and configure the limit or target that applies to that type.
- For debt, verify whether you owe money or someone owes you. Review carry-forward and interest settings where available.
- Save to retain the category changes or cancel to keep the prior configuration.
- Use the monthly budget card to record income; changing an expense limit does not add a Budget transaction.
 Open full screenshot
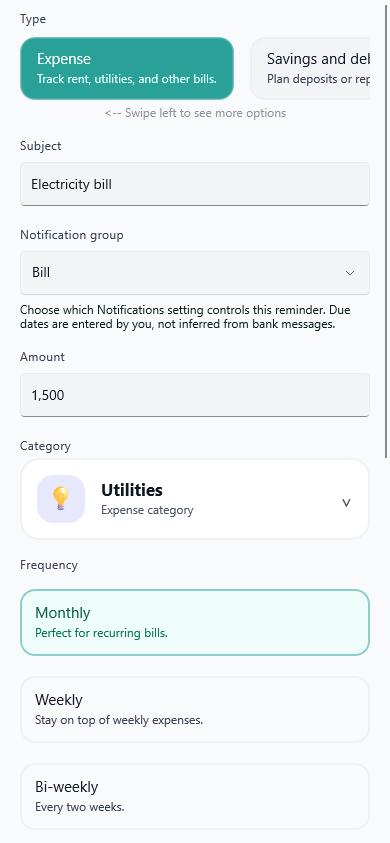
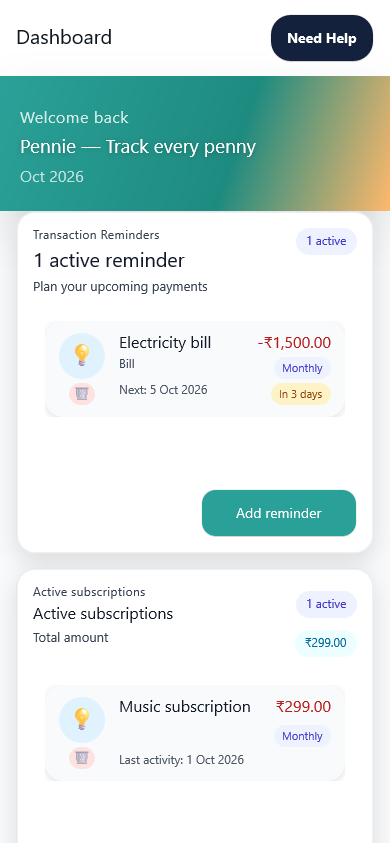
Find it: Dashboard reminders or an available reminder action > Add
Plan a prompt for a future action without recording that the money has already moved.
How to use it
- Choose the reminder's category and enter the useful amount or description.
- Set the due date and time and the supported repeat option.
- Review delivery settings if you want notifications on your phone.
- Save the reminder, or cancel without creating it.
- When the payment actually happens, record or review the transaction separately.
 Open full screenshot
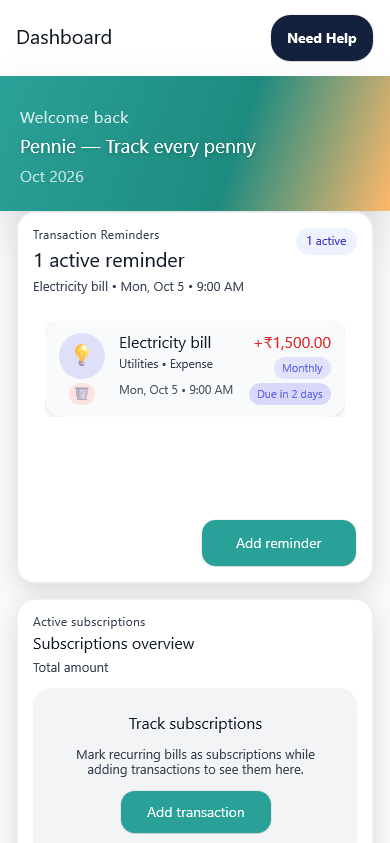
Find it: Dashboard > Reminders
Inspect upcoming and due reminders, edit plans, and remove prompts you no longer need.
How to use it
- Open the reminder list and inspect its date, category and status.
- Add a new reminder or open an existing item for editing.
- Use the supported completion or removal action only after checking the item.
- Return to Notifications settings to adjust delivery rather than repeatedly recreating reminders.
 Open full screenshot
 Open full screenshot
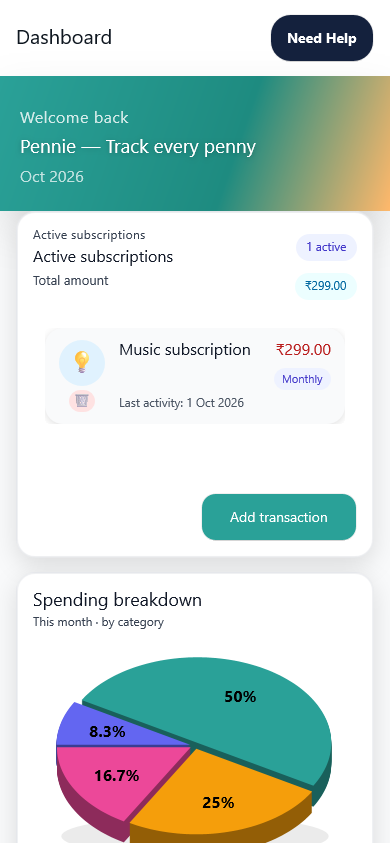
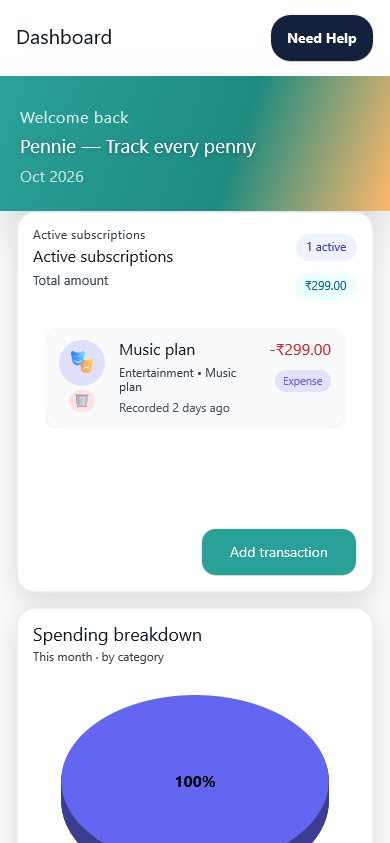
Find it: Add transaction > Subscription, or Dashboard > Subscriptions
Mark recurring expenses and review their cadence in Pennie. Subscription tracking is bookkeeping, not management of the merchant's contract.
How to use it
- For a recurring expense, enable the subscription option and review its repeat information.
- Save the transaction after checking amount, category and date.
- Open Dashboard subscriptions to inspect the resulting tracked items and supported management actions.
- Edit or stop tracking an item when your circumstances change.
 Open full screenshot
 Open full screenshot
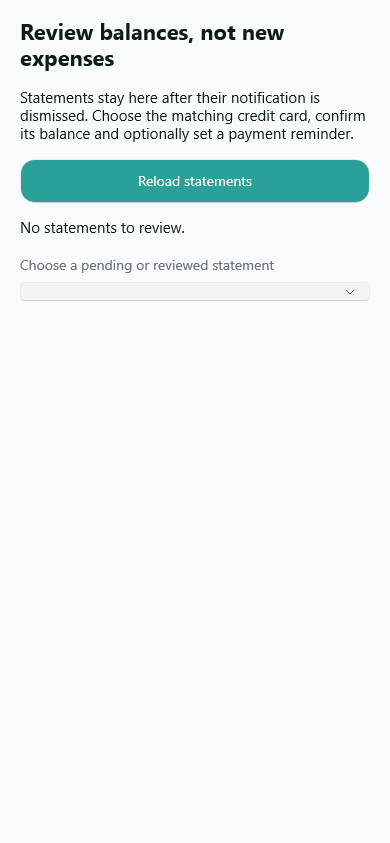
Find it: Notifications Review > Credit-card statements
A statement describes a card balance and obligation. It is not another purchase, new borrowing or confirmation that you paid the card.
How to use it
- Open a retained statement and check the statement date and amount.
- Choose the correct card/debt category.
- Confirm the balance only if it agrees with the statement you intended to record.
- Review any offered payment reminder separately.
- Record a later payment as the appropriate debt movement, not as another statement.
 Open full screenshot
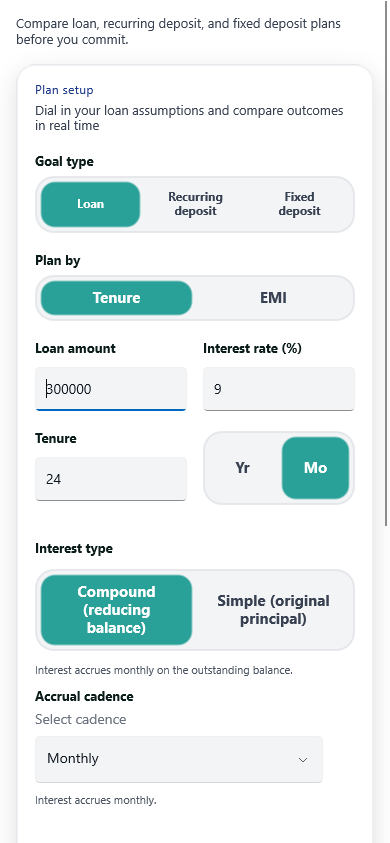
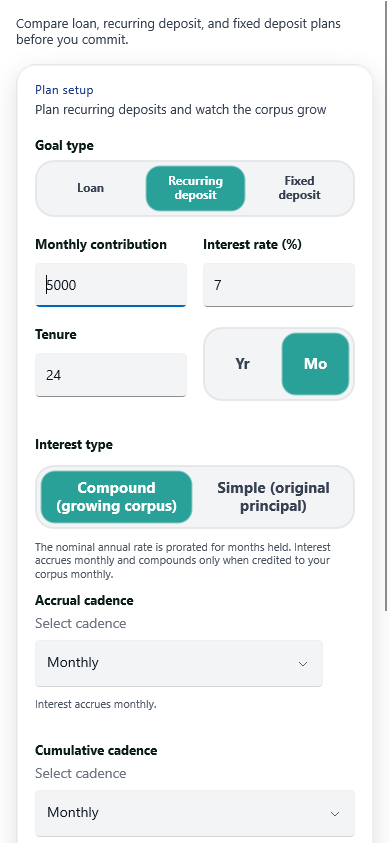
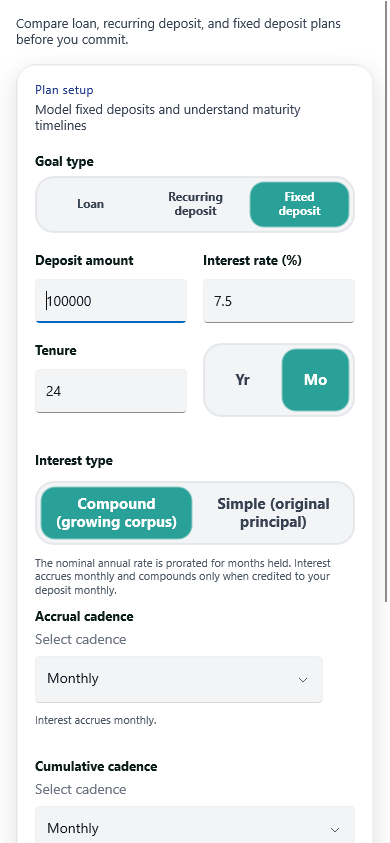
Find it: Settings > EMI Planner
Compare loan payments and recurring or fixed-deposit estimates without changing your ledger.
How to use it
- Choose Loan, Recurring deposit or Fixed deposit.
- Enter the principal or contribution, rate and duration using the units shown.
- Calculate and inspect the summary, interest and available schedule.
- Change inputs to compare alternatives.
- Record real loan or savings movements separately when they occur.
 Open full screenshot
 Open full screenshot
 Open full screenshot
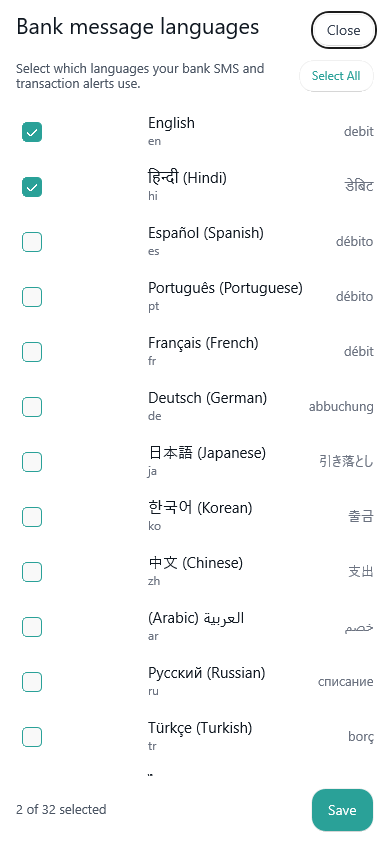
Find it: Open a selector from Preferences, onboarding or Categories
Selectors keep detailed lists out of the main form. Each one returns to its caller with a specific choice.
How to use it
- Open the relevant currency, language or icon action.
- Use search where offered, then inspect the matching choices.
- Apply or select the value and check it in the original form.
- Cancel to keep the previous selection. Save the parent form if that form has its own Save action.
 Open full screenshot
Open full screenshot
Open full screenshot
Find it: Reports > Period, category or chart selector
Use the right scope before comparing numbers. A chart selection and a reporting period are not interchangeable.
How to use it
- Choose a supported time frame in Summary or Trends, then select its period.
- Use category search or chart selection for the detail you want to examine.
- Check whether a displayed total is all spending or a filtered breakdown.
- Return to Both or clear selections before making an all-category comparison.
- Open Budget for its current-month view; do not interpret it as an arbitrary historical budget snapshot.
 Open full screenshot
05
Make Pennie yours
Display choices, notification delivery, backup and device security have their own Settings pages.
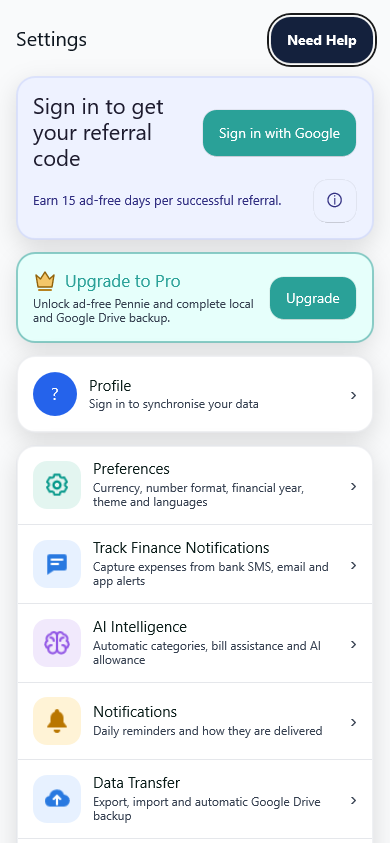
Find it: Bottom tabs > Settings
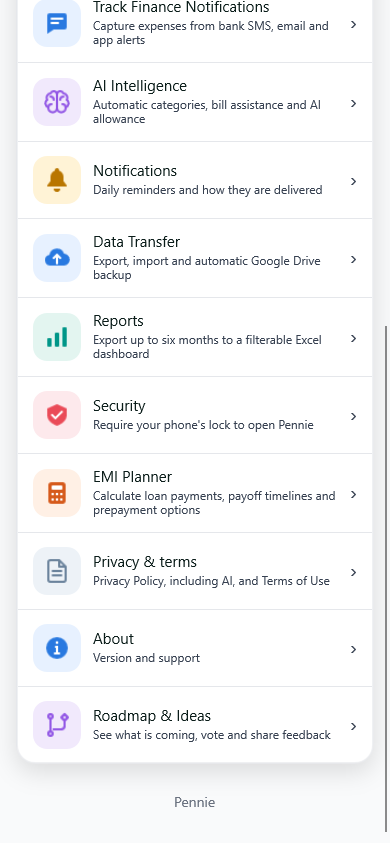
Settings is the directory for account, capture, AI, notification delivery, data transfer, exports, security and support.
How to use it
- Use Profile for account and referral actions; use Preferences for display defaults.
- Open Track Finance Notifications for source-app selection, review and manual parsing.
- Use AI Intelligence for cloud consent, allowance, the AI plan and bill scanning.
- Open Notifications to change reminder delivery, or Data Transfer for backups.
- Use Reports for Excel, Security for device authentication and EMI Planner for estimates.
- Scroll to Privacy & terms, Roadmap & Ideas or About. Inside About, use Explore more apps for the Prayo catalog.
 Open full screenshot
 Open full screenshot
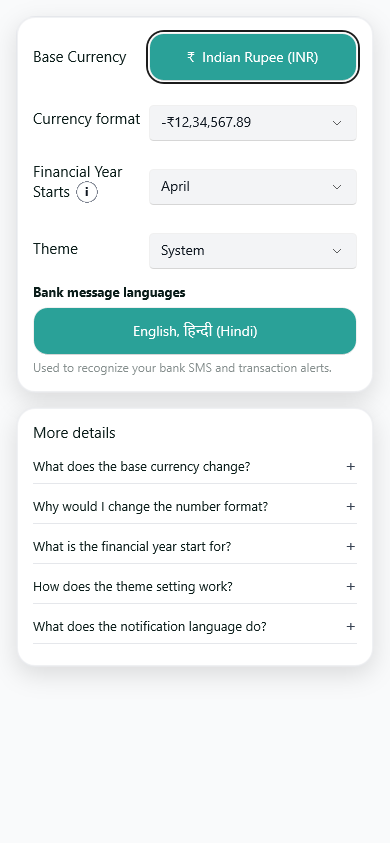
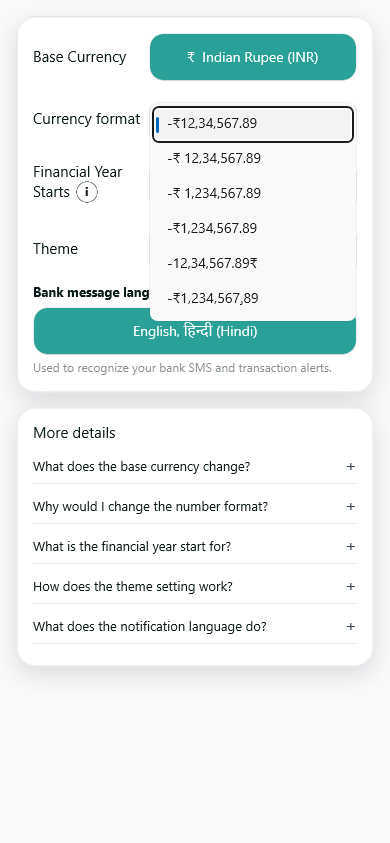
Find it: Settings > Preferences
Choose how Pennie presents money and which message languages the local capture path should consider.
How to use it
- Choose the base currency and inspect any explanation before changing an established ledger.
- Select the number format you find easiest to read.
- Set the financial-year starting month for the reporting convention you use.
- Choose System, Light or Dark appearance.
- Select the supported bank-message languages and use the page's help for their scope.
 Open full screenshot
 Open full screenshot
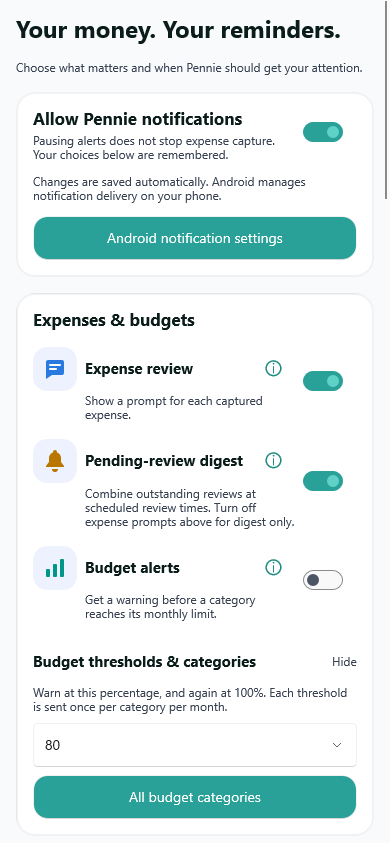
Find it: Settings > Notifications
Decide which Pennie reminders you want and how they are delivered. This page does not choose which bank apps are captured.
How to use it
- Review budget, transaction-reminder, savings and subscription-related alert choices.
- Set daily or recap times only for the reminders you want.
- Configure quiet hours and check how they affect delivery.
- Choose the available sound and lock-screen detail settings.
- Check Android notification permission and channel settings if alerts are not appearing.
 Open full screenshot
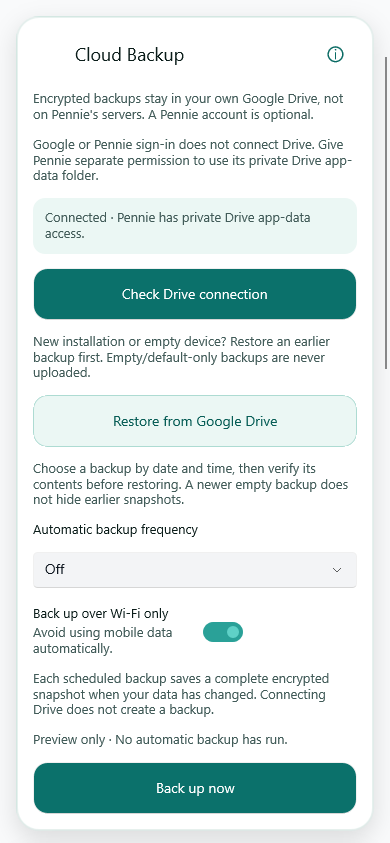
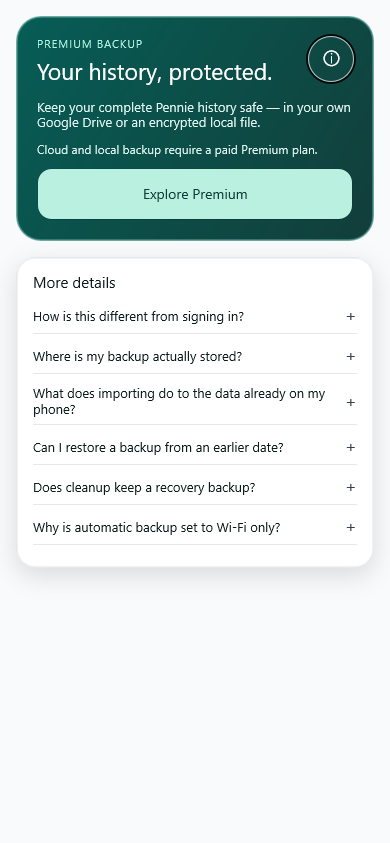
Find it: Settings > Data Transfer
Create or restore database backups deliberately. Eligible local backup and Google Drive backup are regular Premium features, not benefits of AI Premium alone.
How to use it
- Check regular Premium eligibility before choosing backup features.
- For Drive, connect the Google account through the separate authorisation flow.
- Create a manual backup or configure the available automatic schedule.
- Check the visible completion or error state; a selected schedule is not proof that a backup exists.
- Use the local export/import actions for the supported backup file workflow.
- Before restore or cleanup, read exactly which data will be replaced or removed.
 Open full screenshot
 Open full screenshot
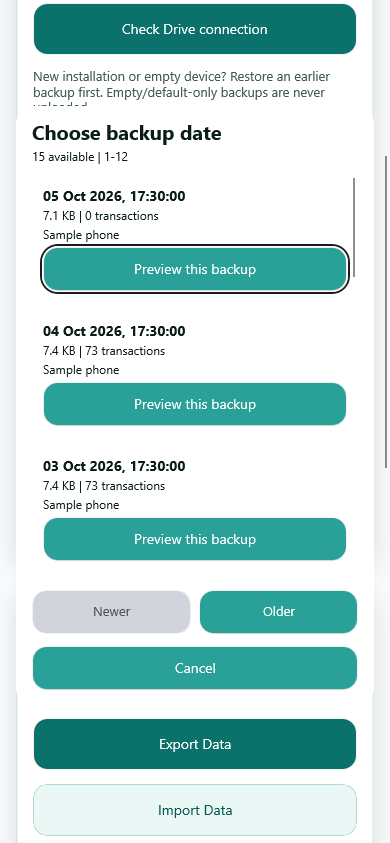
Find it: Settings > Data Transfer > Restore or Import
Treat restore as replacement of your current database, not an import that adds a few missing rows.
How to use it
- Keep a separate current backup before replacing data you may still need.
- Select the intended Drive backup or local backup file and inspect its details.
- Wait for validation. Do not continue with a corrupt or unsupported file.
- Read the replacement confirmation, then cancel or explicitly confirm.
- Let Pennie complete the restore and restart/reload path. Verify your categories and transactions afterward.
 Open full screenshot
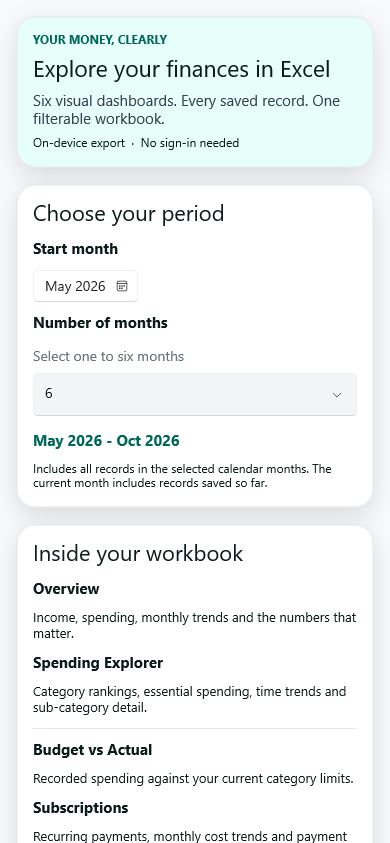
Find it: Settings > Reports
Generate a local Excel workbook for a selected period. It is a readable financial export, not a new AI report or a restorable database backup.
How to use it
- Choose the start month and one to six calendar months; check the displayed date range. The current month contains only records saved so far.
- Use Export Excel workbook and wait for the file action.
- Save or share it to a destination you trust.
- Open it in a spreadsheet application and inspect the worksheet tabs, totals and filters.
- For a wider view, use a desktop or landscape display; open the full screenshot rather than a narrow phone crop.
 Open full screenshot
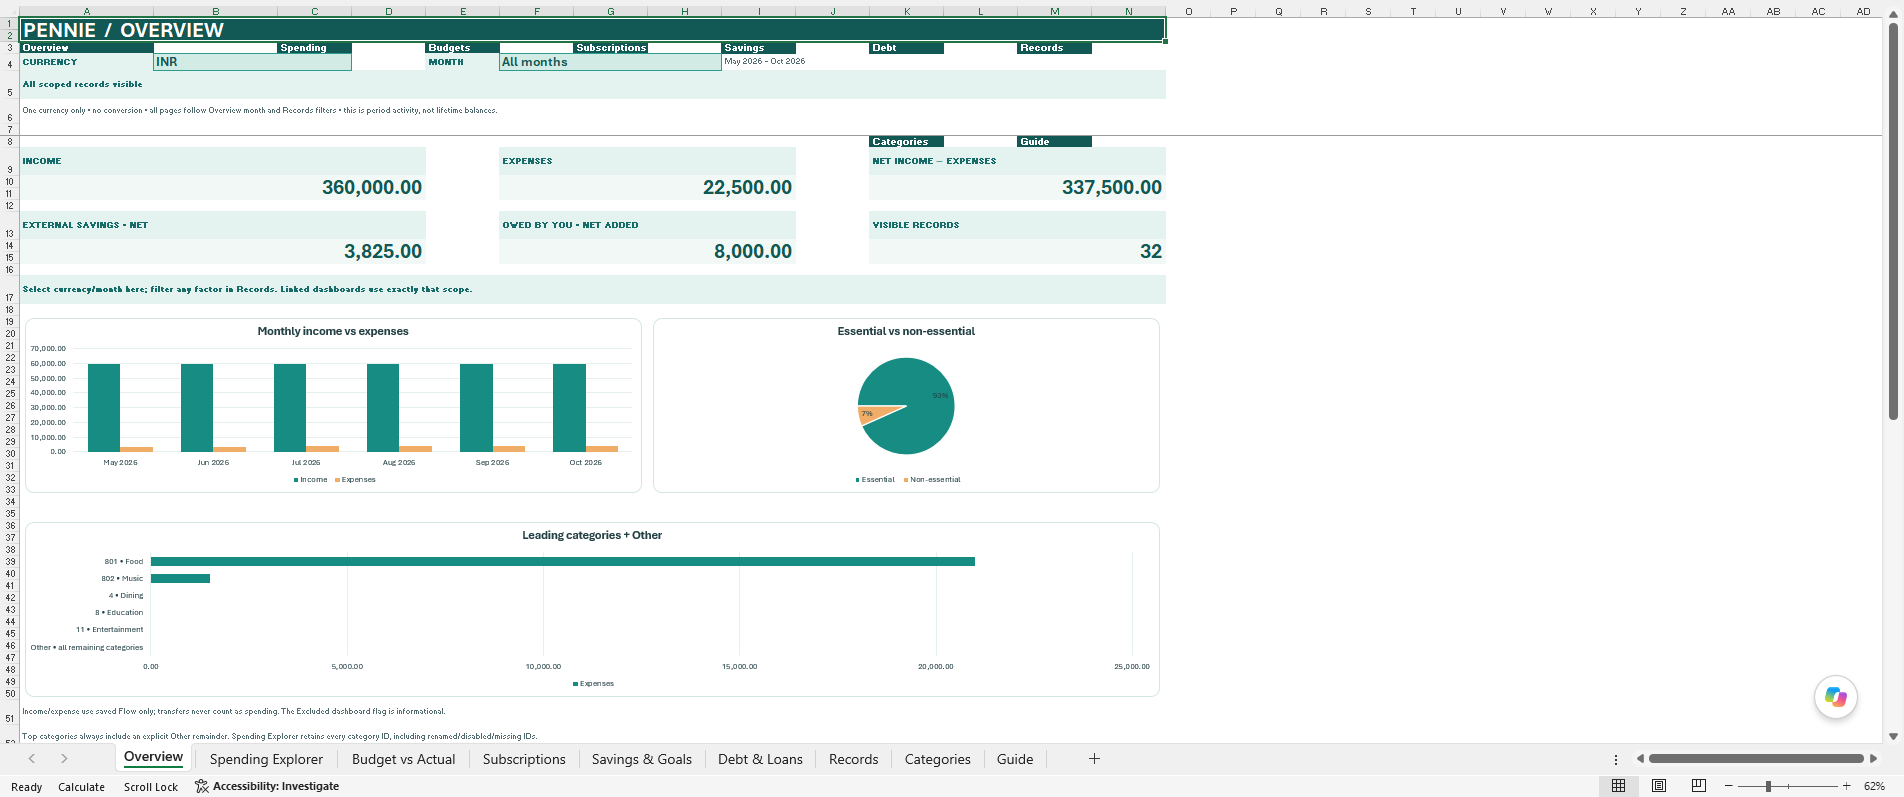
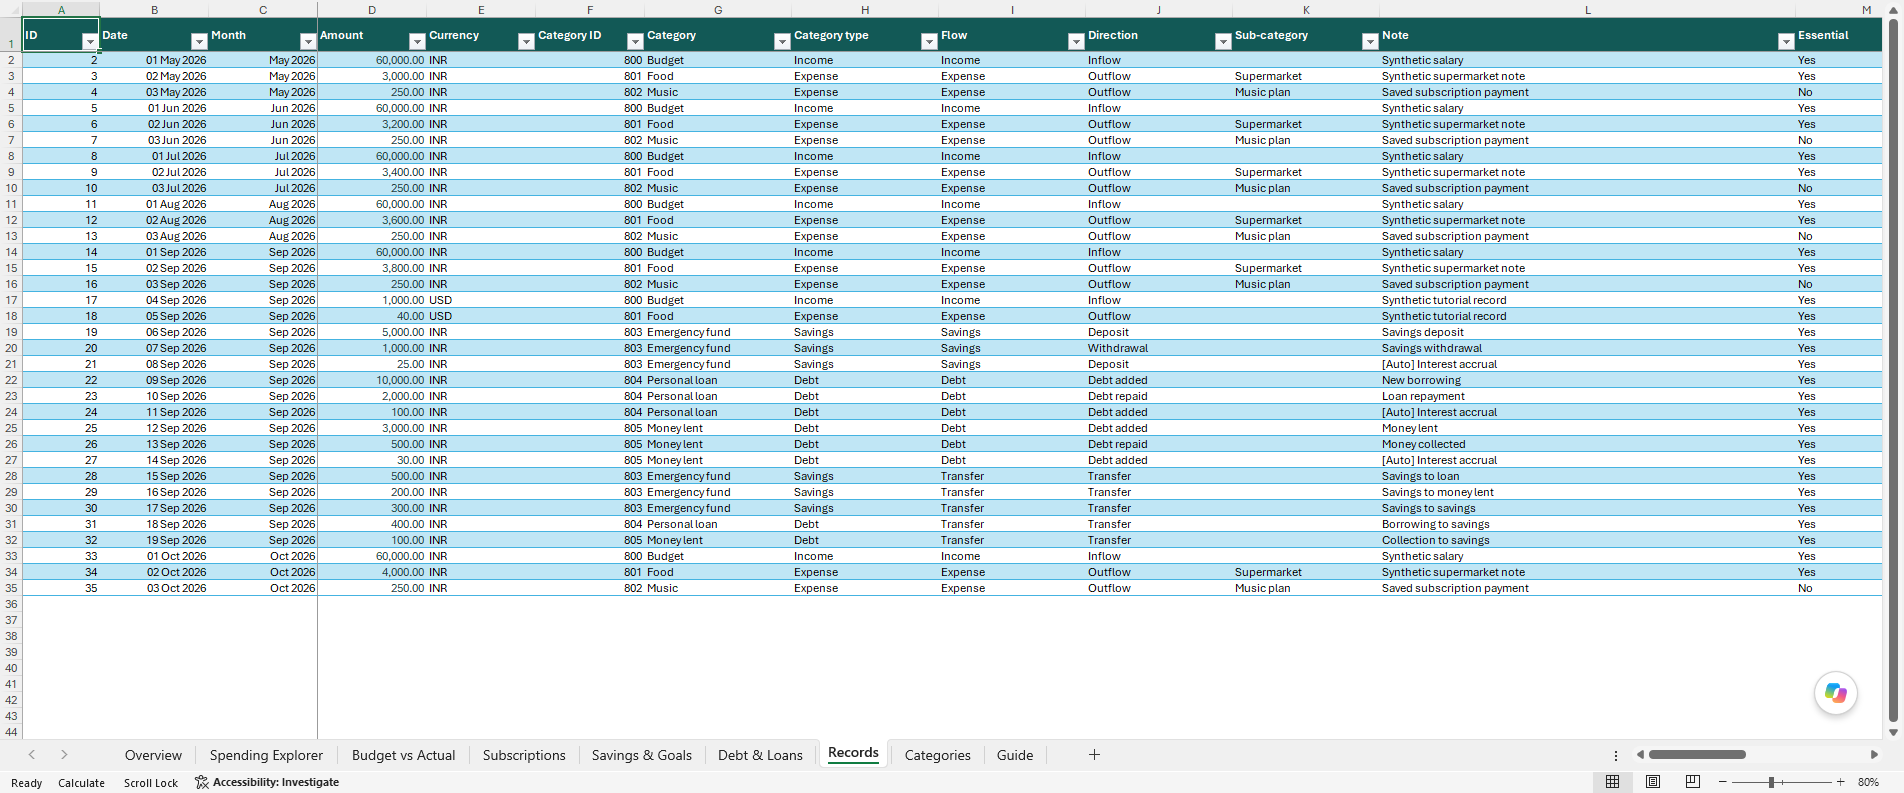
Find it: Open an exported .xlsx file in your spreadsheet application
Use the workbook's full-width tables to understand the relationship between summary totals and individual records.
How to use it
- Start with Overview and confirm the exported date range and selected currency.
- Use Records and its column headings to inspect dates, flows, categories, amounts and notes. Scroll horizontally for additional fields instead of shrinking the text until it is unreadable.
- Explore Spending Explorer, Budget vs Actual, Subscriptions, Savings & Goals and Debt & Loans. Categories and Guide provide supporting information.
- Use month/currency selections and table filters to narrow the scope; reset them before comparing the full total.
- Widen columns, adjust zoom or use landscape orientation so labels and amounts remain visible together.
 Open full screenshot
 Open full screenshot
Find it: Settings > Security
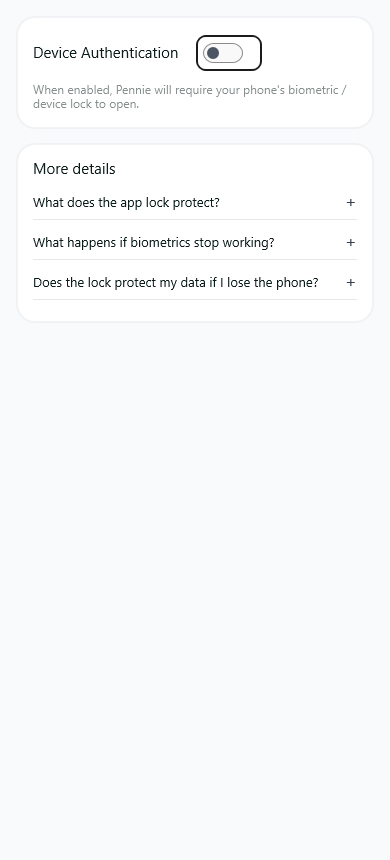
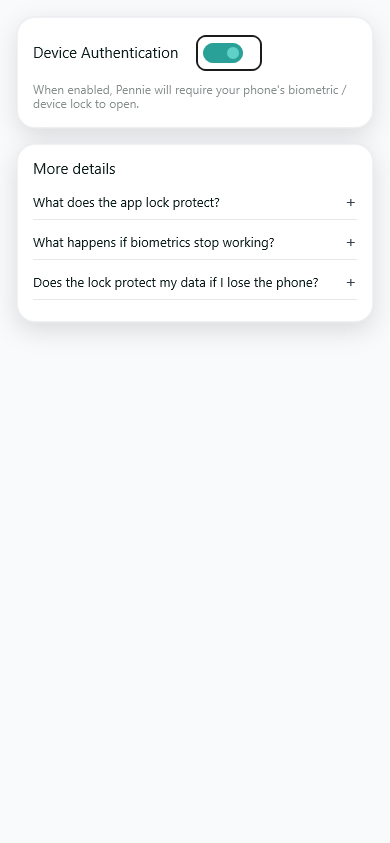
Use Android's device authentication to protect access to Pennie when enabled.
How to use it
- Ensure your phone has a supported device lock configured.
- Enable the authentication option and complete the device verification.
- Return to Pennie after leaving it to check the expected lock flow.
- If device authentication is unavailable, use the phone's security settings rather than looking for an old Pennie PIN-creation screen.
 Open full screenshot
 Open full screenshot
Find it: Return to Pennie with device authentication enabled
The lock screen overlays the app until device authentication succeeds. The old Set PIN page is excluded from the current app and is not a setup step.
How to use it
- Use the phone's available biometric or device-credential prompt.
- If you cancel or authentication fails, stay on the lock screen and retry when ready.
- After successful verification, continue to the original page or pending navigation.
- Manage the feature in Settings > Security.
Compatibility, support or device-specific guidance. No obsolete or simulated system screenshot is presented as current UI.
06
Accounts, plans and community
Regular Premium, AI Premium and referral ad-free time are separate. So are account sign-in, Drive authorisation and cloud AI permission.
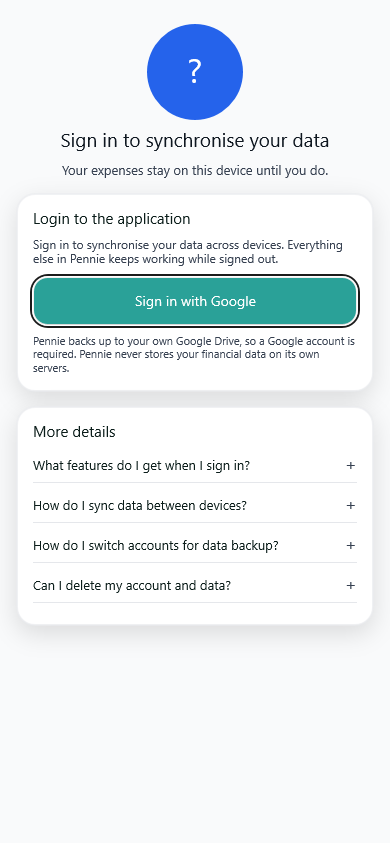
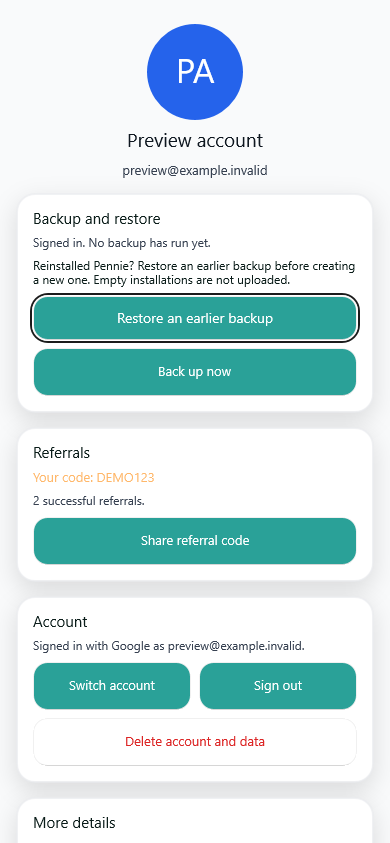
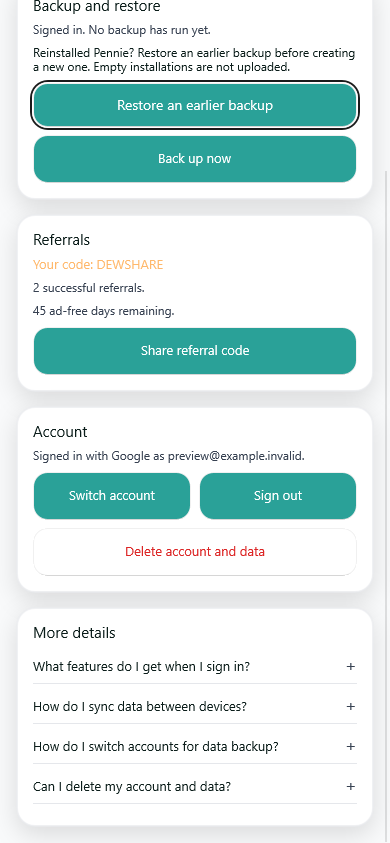
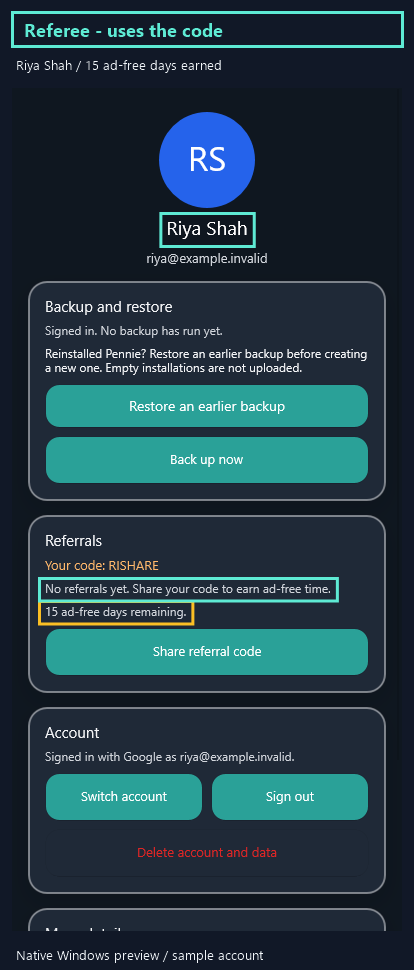
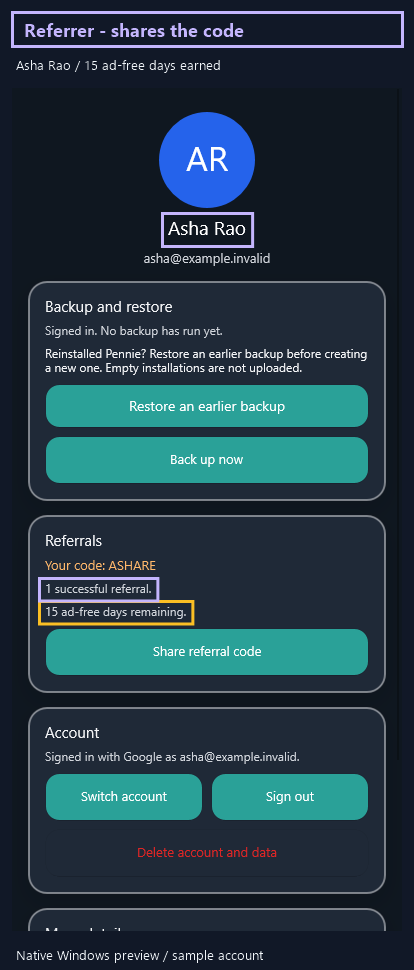
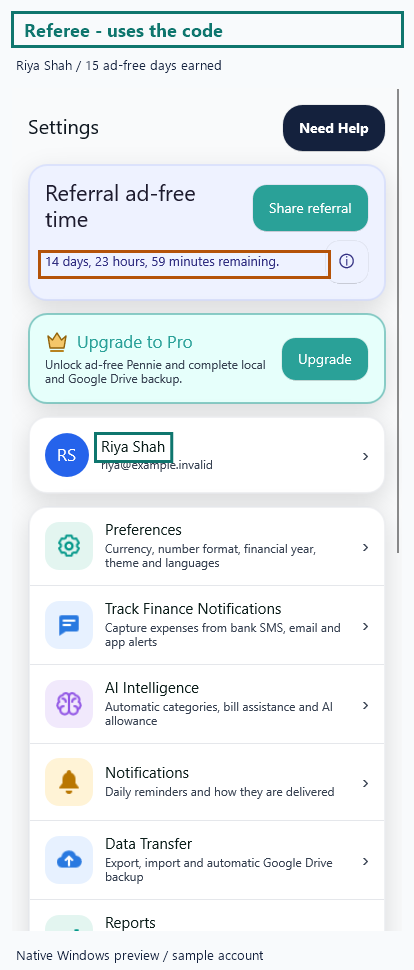
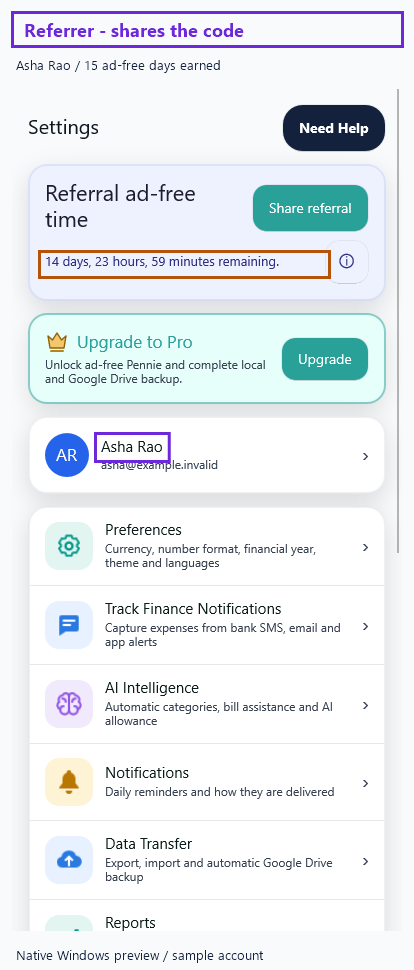
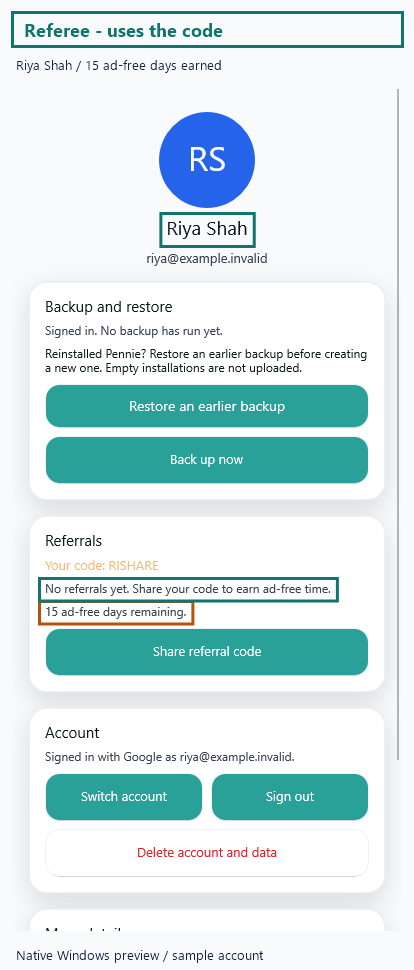
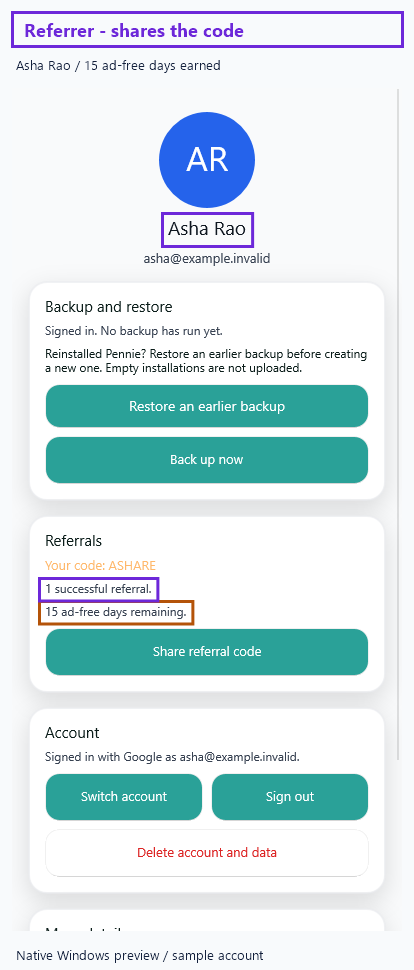
Find it: Settings > Profile
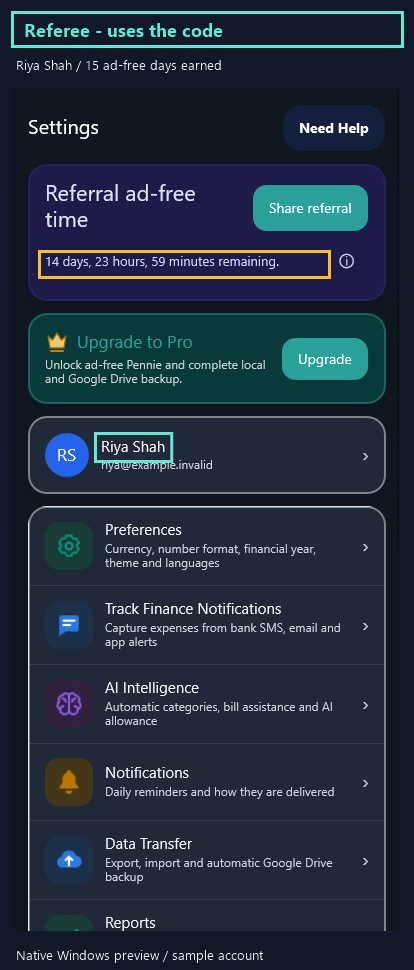
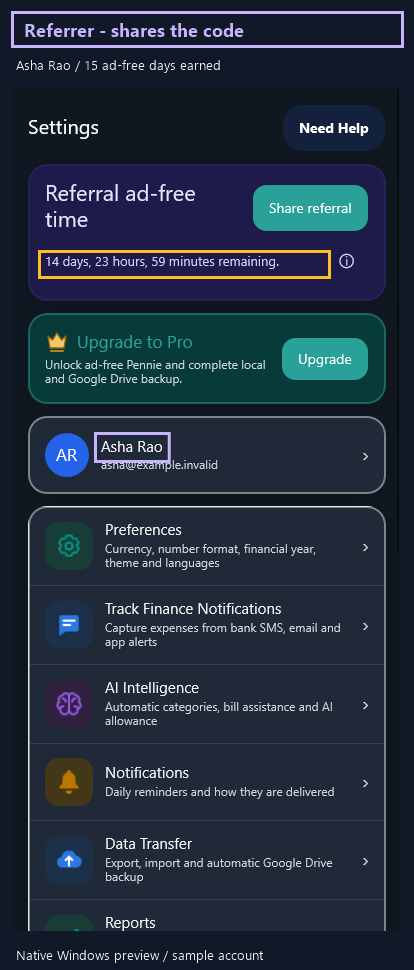
Inspect the current account and referral information without confusing account identity with the phone's local ledger.
How to use it
- Sign in when you want account features, or continue local tracking signed out.
- If a stored session needs recovery, refresh or sign in again as prompted; do not assume the account was deleted.
- Copy or share the displayed referral code using the available actions.
- Check referral ad-free time and the exact expiry after refresh. A failed refresh should not be treated as fresh account data.
- Use account switching, sign-out and deletion actions deliberately after reading their confirmation.
 Open full screenshot
 Open full screenshot
 Open full screenshot
Dark theme
Open a screenshot for a larger view. These are page references, not a recording of every step.
 Open full screenshot
 Open full screenshot
 Open full screenshot
 Open full screenshot
Light theme
Open a screenshot for a larger view. These are page references, not a recording of every step.
 Open full screenshot
 Open full screenshot
 Open full screenshot
 Open full screenshot
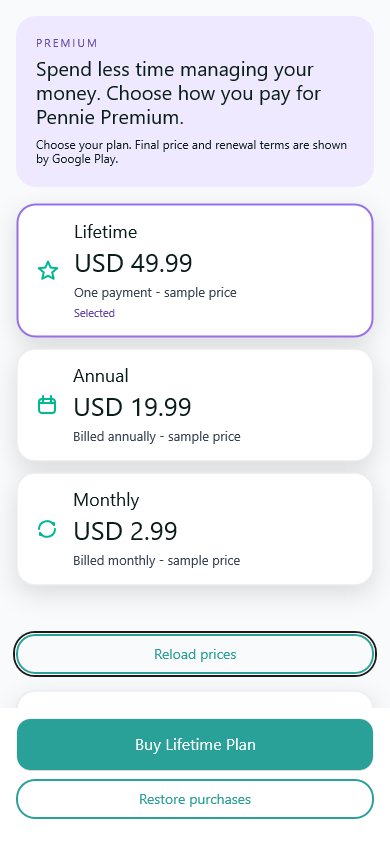
Find it: Settings > Upgrade to Pro / regular Premium
Review regular Premium for paid app privileges such as ad-free use and eligible backup features. Check the current Google Play price before buying.
How to use it
- Compare the available Monthly, Annual and Lifetime options and their displayed prices.
- Read the feature list and any purchase terms before continuing.
- Complete a purchase only through the supported Google Play flow.
- Use restore/manage actions if you already purchased, allowing time for verification.
 Open full screenshot
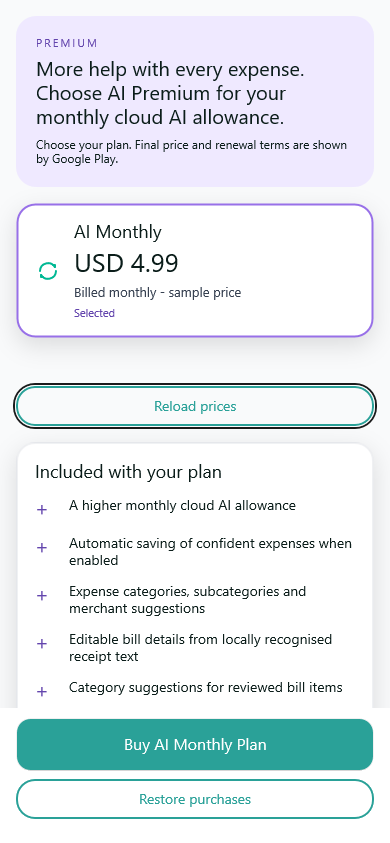
Find it: Settings > AI Intelligence > AI Premium
AI Premium provides a paid monthly AI allowance and eligibility for intentionally configured automatic saving. It is independent of the regular app plan.
How to use it
- Check the current account and the price shown by Google Play.
- Read the monthly allowance and reset information for the AI plan.
- Purchase through the supported account-bound Google Play flow if you want it.
- Keep Enable cloud AI on only when you consent; purchasing is not a substitute for permission.
- Enable automatic saving separately and set the threshold only if you want eligible entries saved without review.
 Open full screenshot
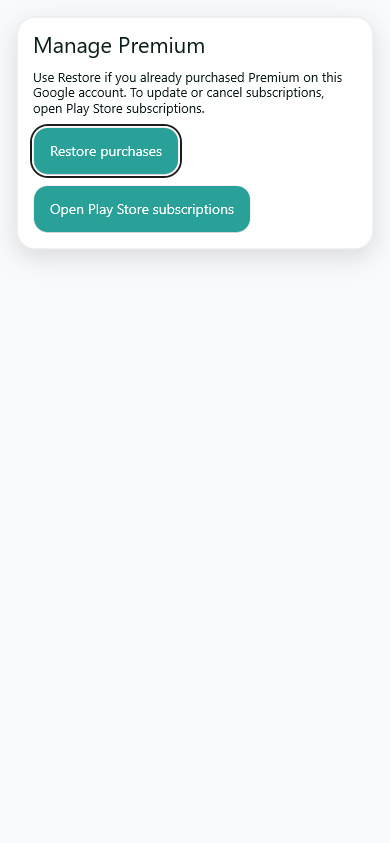
Find it: Settings or a plan page > Manage Premium
Check the entitlement associated with the supported purchase flow and use the appropriate store management action.
How to use it
- Review which plan is shown: regular Premium and AI Premium are separate.
- Use restore/refresh when a completed purchase has not appeared yet.
- Read verification errors rather than assuming an attempted purchase succeeded.
- Open Google Play subscription management for store-side changes when offered.
 Open full screenshot
Find it: AI Intelligence > Enable cloud AI
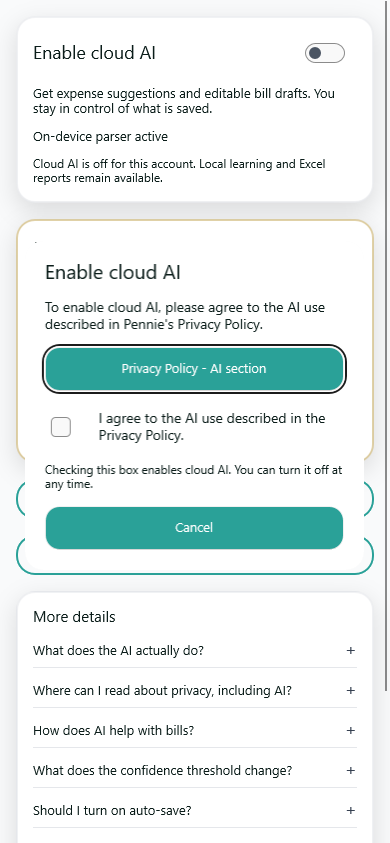
The cloud agreement appears on the same AI Intelligence page. It is independent of general Privacy Policy acknowledgement and other permissions.
How to use it
- Turn on Enable cloud AI to open the agreement.
- Follow the link to the AI section of the main Privacy Policy.
- Read the explanation and check the agreement box only if you consent.
- Checking the box enables cloud AI; Cancel leaves the switch off.
- Turn the master switch off at any time to stop future cloud requests.
 Open full screenshot
 Open full screenshot
Find it: A gated feature > its unlock offer, or a permission explanation
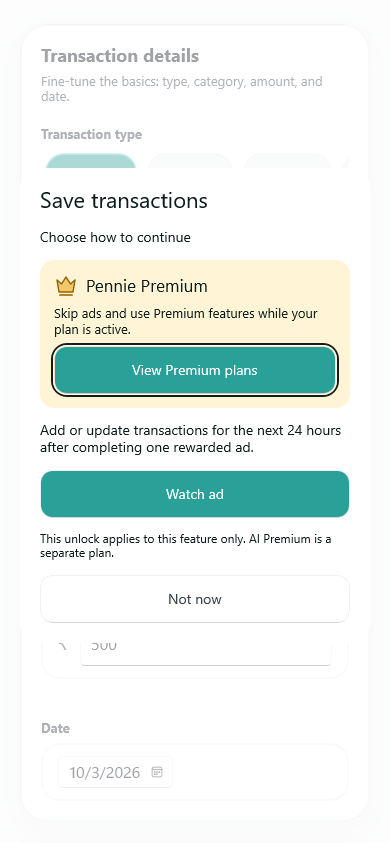
Some features offer time-limited access after a completed rewarded ad, or access through regular Premium. Read the offer for the feature you are actually opening.
How to use it
- Check the feature name and displayed access duration.
- Choose a supported access option or cancel without changing your data.
- Only a completed reward grants the advertised access. Closing, failing or skipping an ad does not.
- For Android permissions, read the rationale and continue to the system prompt only if you agree.
 Open full screenshot
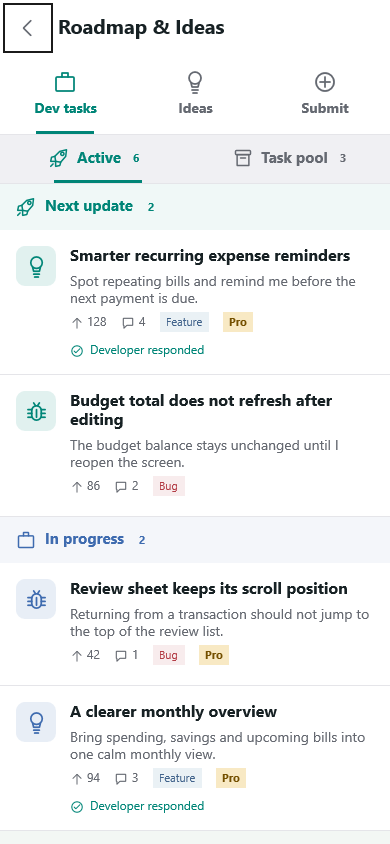
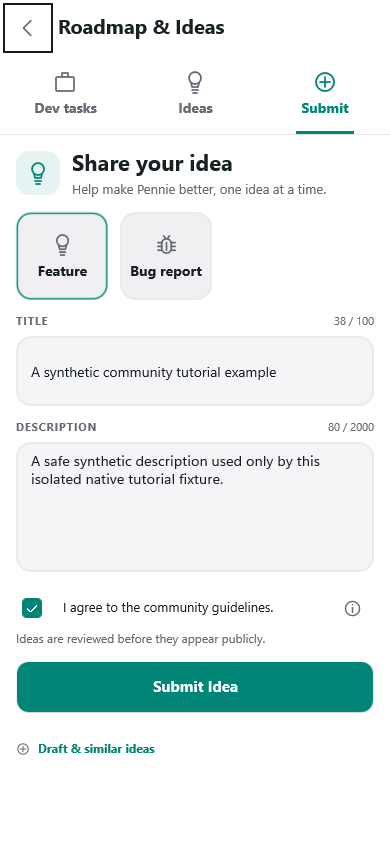
Find it: Settings > Roadmap & Ideas
See planned work, browse ideas and submit product feedback. Pennie participation uses a private guest installation identity even when the main app is signed in.
How to use it
- Browse the Dev tasks and Ideas tabs and their available filters.
- Open an item to read its details before submitting a duplicate.
- Use Submit to open the feature or bug form and clearly describe what you need or what happened.
- Review the content before submitting and avoid personal finance, account secrets or private message text.
- If offline or submission fails, retain the draft and use the shown retry path.
 Open full screenshot
 Open full screenshot
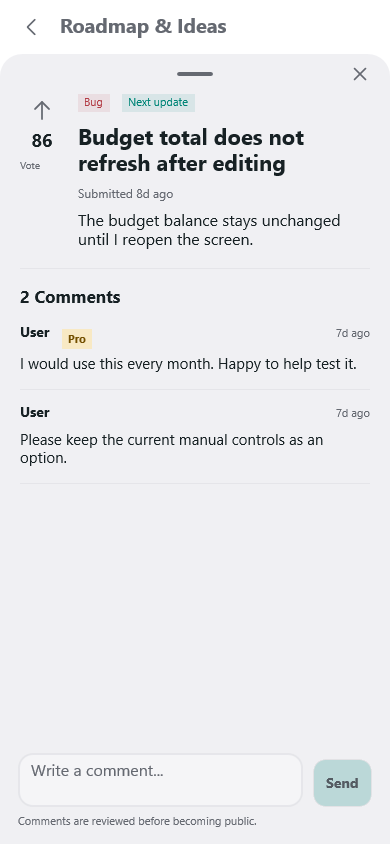
Find it: Roadmap & Ideas > Open an item
Read the item's status and discussion, then use the available vote and comment actions.
How to use it
- Check the idea or bug description and its current status.
- Add or remove your vote using the displayed control.
- Write a relevant comment and submit it when ready.
- Check whether the comment is pending moderation rather than assuming it is public immediately.
- Retry uncertain submissions through the retained operation instead of posting duplicates.
 Open full screenshot
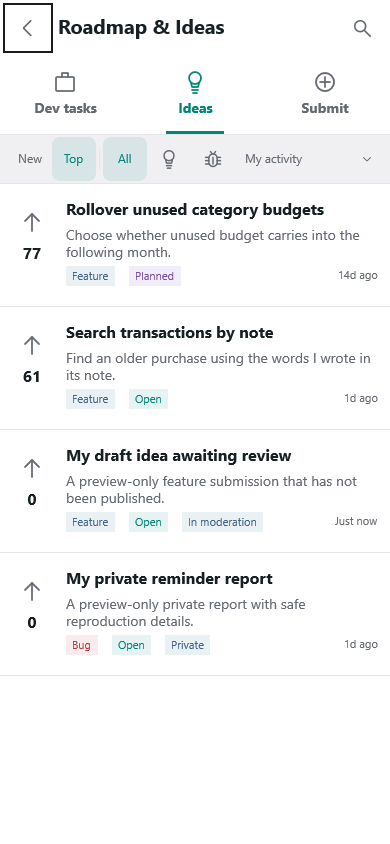
Find it: Roadmap & Ideas > Compose or My activity
Keep track of your guest submissions and votes, and finish a draft without unnecessarily sending it twice.
How to use it
- Start an idea or bug draft and check its title and description.
- Use the existing retry state after an uncertain network outcome.
- Open My activity to view the guest activity available to this installation.
- Review pending comments separately from published comments.
 Open full screenshot
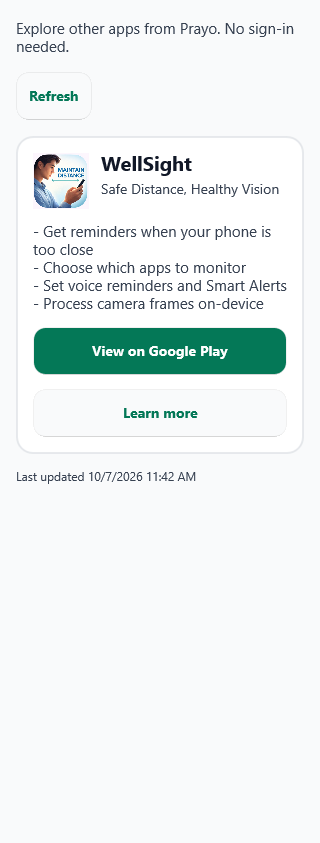
Find it: Settings > About > Explore more apps
Browse Prayo's current app catalog and open a supported store listing. Catalog contents are managed centrally rather than fixed into the Pennie app.
How to use it
- Open the catalog and wait for its current result.
- Read each app's description and use its store action if interested.
- Refresh when needed. If cached content is shown after an error, read the stale/error notice.
- If nothing is available for your platform, the page can be empty without implying an installation problem.
 Open full screenshot
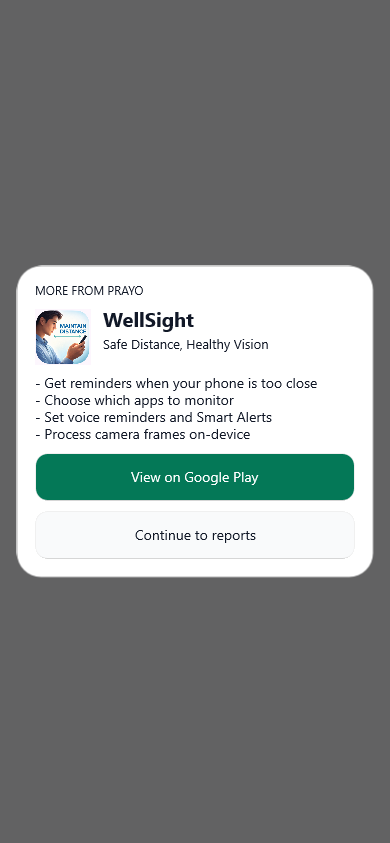
Find it: Reports > Prayo recommendation card, when shown
Reports can show recommendations from the same Prayo catalog used by More apps. These are separate from network advertising.
How to use it
- Read the app recommendation and open the store only if you are interested.
- Dismiss it to hide it for that appearance of Reports.
- Use More apps by Prayo for the catalog rather than waiting for a rotating card.
- If the catalog cannot load, continue using your local report.
 Open full screenshot
Find it: Settings > Profile > Account or referral action
Use account actions deliberately and read their scope. Local data, AI data, Drive files, community participation and store subscriptions are not one shared switch.
How to use it
- Refresh Profile before relying on referral time or entitlement displays.
- Use the referral entry/share actions as instructed; a code entered or a sign-in alone is not confirmation of a successful referral.
- Before switching or signing out, check which account-specific features you are using.
- Read the deletion confirmation and the Privacy Policy for the data it covers.
- Manage Google Play subscriptions and separately held exports/backups through their own services where necessary.
Open full screenshot
07
Privacy, support and older screens
Find help and understand what happens to your data. Older compatibility routes are described here, not promoted as new features.
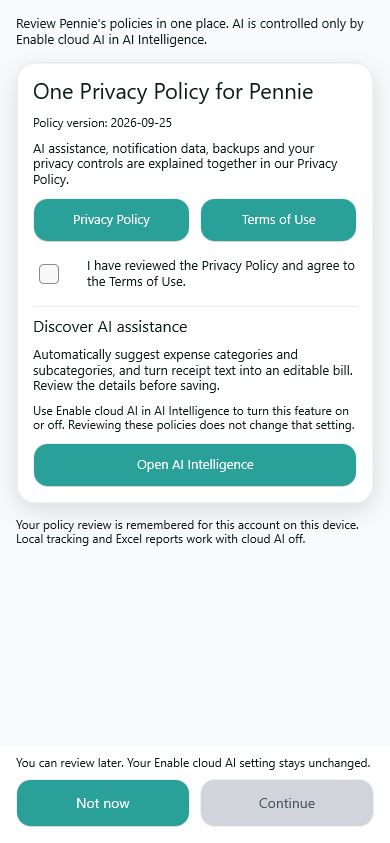
Find it: Settings > Privacy & terms, or About > Privacy
Review the main Privacy Policy and Terms and the current general acknowledgement. Optional connected features keep their own explicit choices.
How to use it
- Open the policy or terms link to read the full public document.
- Review or record general acknowledgement when requested.
- Use the AI Intelligence link for cloud AI settings rather than looking for a second switch here.
- Check Drive, device permissions, community submissions and exported files independently.
 Open full screenshot
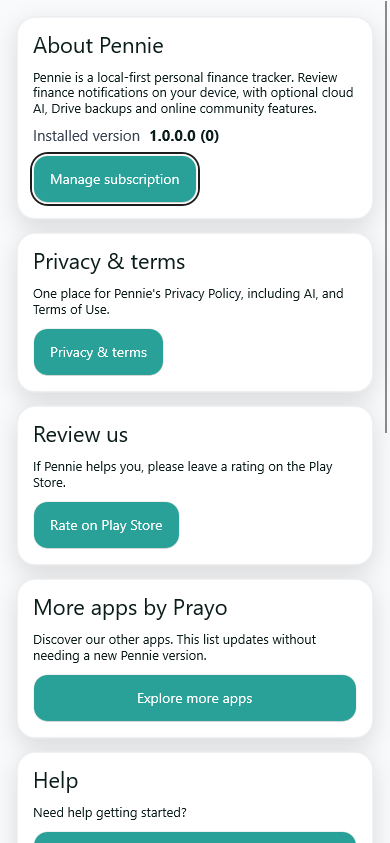
Find it: Settings > About or a page's Need Help action
Find app information, the guide, policy review and support links. Use the version shown in your installed app when reporting a problem.
How to use it
- Open About and check the app version.
- Use Need Help or the website link to find the guide for the relevant page.
- Use the support email action for a reproducible problem and explain the steps you followed.
- Review any attachment before sending it; share only the information needed to diagnose the issue.
 Open full screenshot
Find it: Support/debug route when available in your build
Diagnostics are a support-only surface. Developer controls and old test switches are not normal product features or instructions for unlocking paid access.
How to use it
- Use diagnostics only when support asks for a specific reproduction.
- Begin the relevant logging before reproducing an intermittent issue.
- Export only the requested evidence and inspect it for sensitive message or account details.
- Do not use debug trial, ad or entitlement controls as evidence of production behavior.
Compatibility, support or device-specific guidance. No obsolete or simulated system screenshot is presented as current UI.
Find it: App launch while Pennie initialises or recovers
Pennie prepares local services and the database before opening the main tabs. A startup failure must be addressed without assuming the ledger has been lost.
How to use it
- Wait for initialisation to finish before tapping repeatedly.
- If a retry action is shown, use it once and inspect the result.
- If the problem persists, note the app version and visible error and contact support.
- Do not clear app storage or uninstall an app containing your only copy of the ledger just to dismiss a loading screen.
 Open full screenshot
Find it: Legacy compatibility route; not the current Reports entry path
The old Reports access screen remains for compatibility, but current local Reports is free to open.
How to use it
- Open the Reports tab directly for Summary, Budget and Trends.
- Do not watch an ad or purchase a plan merely to unlock local Reports.
- If an old link opens an obsolete access screen, return to the current Reports tab.
Compatibility, support or device-specific guidance. No obsolete or simulated system screenshot is presented as current UI.
Find it: Legacy Previous AI reports route, where retained
New monthly AI report generation is retired. Compatibility support remains for previous stored reports and their links.
How to use it
- Use local Reports for current charts and analysis.
- Use Settings > Reports for a new local Excel export.
- Where an older saved AI report is available, use its supported read/share/revoke actions.
- Revoke an old shared link when you no longer want it accessible.
Compatibility, support or device-specific guidance. No obsolete or simulated system screenshot is presented as current UI.